• Skip to primary navigation
  • Skip to main content
  • Skip to primary sidebar
  • Home
  • Collaborate with us
  • Contact

Serena Lissy logo

  • Recipe Index
  • Privacy Policy
menu icon
go to homepage
  • Christmas
  • Recipes
  • Photography
  • About
    • Facebook
    • Instagram
    • Pinterest
  • search icon
    Homepage link
    • Christmas
    • Recipes
    • Photography
    • About
    • Facebook
    • Instagram
    • Pinterest
  • ×

    Serena Lissy » Recipes

    Blog

    Chocolate Pudding Cupcakes

    October 28, 2015

    Chocolate Pudding Cupcakes

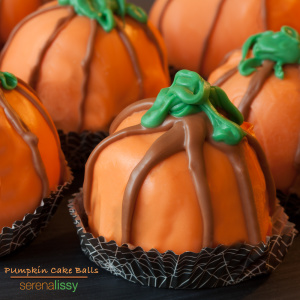
    These easy chocolate pudding cupcakes are moist and loaded with chocolate. We've added some Halloween decorations to this chocolate cupcake recipe, but they are perfect for making any time.

    Chocolate Pudding Cupcakes are moist, delicious and full of chocolate. Start by doctoring up a boxed cake mix and top them with a flavorful frosting. Chocolate frosted cupcakes can be decorated for any holiday. We added Oreo crumbs and Halloween peeps for a fun Halloween Chocolate cupcake recipe.

    We recently had a house full of friends staying with us for a charity bike ride that we participated in, so what better way to use a house full of tasters. It was the perfect opportunity to try out a new chocolate cupcake recipe. There is nothing better in my world than when I want one cupcake, and I have five other willing participants who want to eat the other 23 cupcakes. Win/Win!

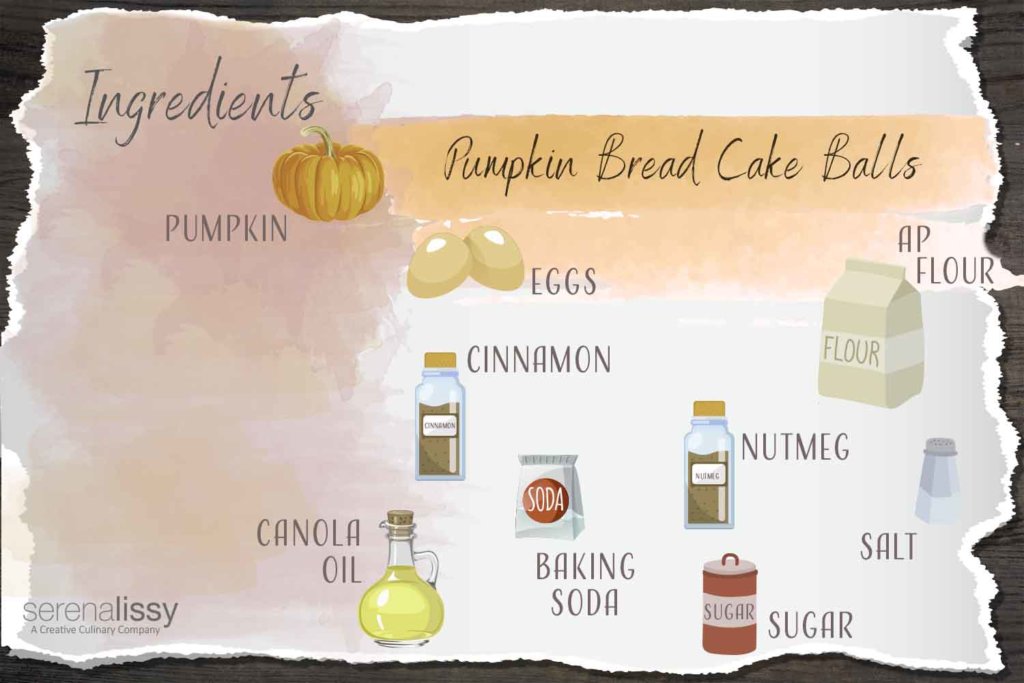
    Ingredients in Chocolate Pudding Cupcakes

    Baking from scratch is wonderful, but there are occasions when I start with a boxed mix and doctor it up, and that's exactly what I decided to do for these chocolate frosted cupcakes. Honestly, there is no shame, and when paired with a store-bought pudding mix, you will end up with the moistest chocolate pudding cupcakes ever!

    • Betty Crocker Triple Chocolate Fudge Cake Mix
    • Instant chocolate pudding mix 
    • Semisweet chocolate chips
    • Sour cream
    • Vegetable oil
    • Warm water
    • Eggs
    • Almond extract
    • Whole milk
    • Whipped topping
    • Oreos

    How To Make Easy Chocolate Pudding Cupcakes

    Chocolate Pudding Cupcakes Process Collage
    1. Combine the cupcake ingredients and fill 24 cupcake liners before baking until a toothpick inserted in the center comes out clean.
    2. While the cupcakes bake, prepare the pudding filling and refrigerate for at least one hour.
    3. When the cupcakes have cooled, use a knife to core the center of each cupcake. Fill with pudding and cover with the cake piece you removed.
    4. Frost the cupcakes and decorate as desired before serving.

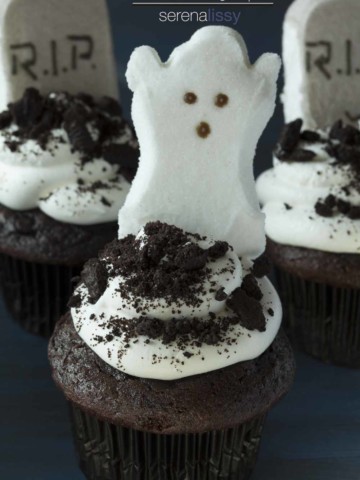
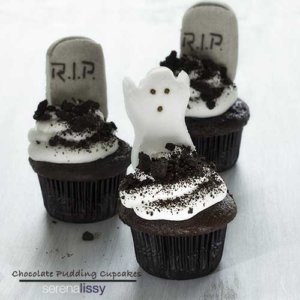
    Halloween Themed Chocolate Frosted Cupcakes

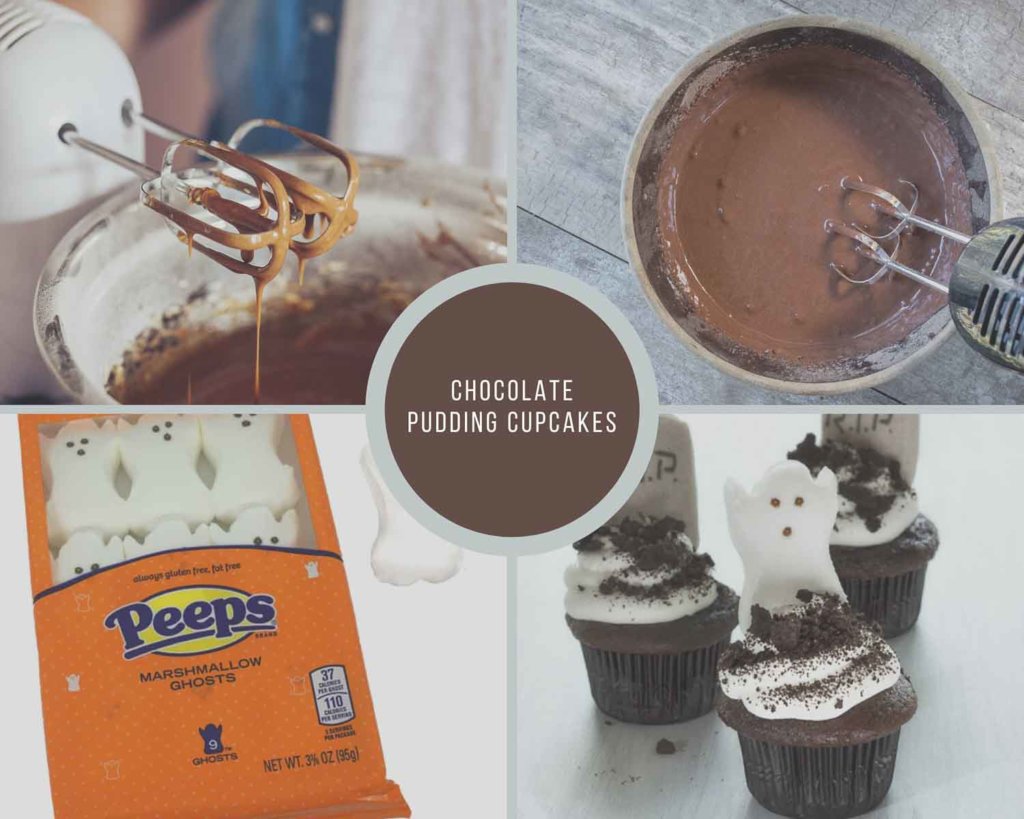
    I was out and about town the other day looking for Halloween items that had been marked down already and to pick up decorations I needed for the house. I was at Target and stumbled upon Peeps. Now for me, Peeps have always been an Easter treat. It never occurred to me that there would be Halloween peeps. These were cute! Ghosts and gravestones. I certainly wasn't going to hold those until next year, so I figured I'd put them to use this last weekend as topping on these Chocolate Pudding Cupcakes.

    I went simple and easy with these cupcakes. I doctored up a packaged cake mix, piped pudding in the middle of the cupcakes, and decorated them with crushed Oreos, cool whip, more pudding, and those adorable Peeps. These are so simple to make and would be really great for a Halloween gathering. I must say, I piled the frosting up pretty high, making them hard to eat without a fork. But if you keep the frosting at a reasonable amount, they are great for any gathering. I also saw some Gummi worms out there. You could also crush up the Oreos to look like dirt with a Peep gravestone and use the worms to crawl out of the top. Halloween cuteness!

    Love Cupcakes? Try These Cupcake Recipes

    • Chocolate Peppermint Cupcakes
    • Red Wine Chocolate Cupcakes
    • Chocolate Pumpkin Stout Cupcakes
    • Halloween Bark

    Looking for More Recipes?

    Subscribe to my free newsletter to get new baking tips in your inbox monthly. Find me sharing new recipes and tips on Pinterest, Instagram, or Facebook.

    Chocolate pudding cupcakes

    Chocolate Pudding Cupcakes

    Doctor up a boxed cake mix for moist and delicious cupcakes that are easy to make.
    5 from 15 votes
    Print Pin Rate
    Course: Dessert, Snack
    Cuisine: American
    Prep Time: 15 minutes minutes
    Cook Time: 25 minutes minutes
    Cooling Time: 1 hour hour
    Servings: 24 Servings
    Calories: 174kcal
    Author: Serena

    Ingredients

    Cupcakes

    • 1 package Betty Crocker Triple Chocolate Fudge Cake Mix
    • 1 package instant chocolate pudding mix (3.9 ounces)
    • 1 cup semisweet chocolate chips
    • ¾ cup sour cream
    • ¾ cup vegetable oil
    • ½ cup warm water
    • 3 large eggs lightly beaten
    • 1 teaspoon almond extract

    Pudding

    • 1 box instant chocolate pudding mix (3.9 ounces)
    • 1 ¾ cup whole milk
    • 12 ounce container whipped topping thawed

    Instructions

    Cupcakes

    • Preheat oven to 350°
    • Line muffin tins with paper liners
    • In the bowl of a stand mixer fitted with paddle attachment, beat together cake mix, pudding mix, sour cream, oil, water, eggs, almond extract. Mix for about 2 minutes on medium speed. One mixed fold in the chocolate chips with a spatula.
    • Using a large cookie scoop, distribute the batter into 24 muffin wells.
    • Bake in the oven 19-23 minutes, or until the tops of the cake spring back when lightly touched.
    • Allow cupcakes to cool inside muffin tins for about 10 minutes before removing from the tin. Cool completely on wire rack.

    Pudding

    • In a large bowl beat pudding mix and milk on medium speed until combined and thickened. Fold 1 cup whipped topping into the mix. Cover and refrigerate for one hour.
    • Using a sharp knife, core the center of each cooled cupcake. Reserve the pieces that you have removed.
    • Fill a large Ziploc bag with chilled pudding and pipe pudding into the center of the cupcakes. Cover the pudding with reserved cake pieces.

    Decorate

    • Fill a large piping bag with remaining whipped topping. Pipe onto cupcakes. Sprinkle with crushed Oreos and top with a Peep ghost.
    • Refrigerate until ready to serve.

    Notes

    Recipe Source: SerenaLissy.com
    This website provides approximate nutrition information for convenience and as a courtesy only. Nutrition data is gathered primarily from the USDA Food Composition Database via Spoonacular API, whenever available, or otherwise other online calculators. While this information can be helpful in estimating the nutritional information of a recipe, it is by no means accurate or official and is not evaluated by the Food and Drug Administration.
     
    All images and content are copyright protected. Do not use our images without prior permission.

    Nutrition

    Serving: 1Serving | Calories: 174kcal | Carbohydrates: 9g | Protein: 2g | Fat: 13g | Saturated Fat: 4g | Polyunsaturated Fat: 4g | Monounsaturated Fat: 3g | Trans Fat: 1g | Cholesterol: 29mg | Sodium: 32mg | Potassium: 99mg | Fiber: 1g | Sugar: 6g | Vitamin A: 132IU | Vitamin C: 1mg | Calcium: 51mg | Iron: 1mg
    Tried this Recipe? Pin it Today!Mention @SerenaLissy or tag #serenalissy!

    As an Amazon Associate and member of other affiliate programs, I earn from qualifying purchases. What that means is if you click on one of our affiliate links, they may toss a few pennies our way for a commission.

    Pumpkin Bread Cake Balls

    October 27, 2015

    Pumpkin Bread Cake Balls

    It's that time of year when everything has pumpkin in it. Now don't get me wrong, I'm a lover of pumpkin. I don't know why I don't eat it every month of the year, but for some strange reason, I limit my pumpkin consumption to October and November. Every year I keep saying I'm going to eat pumpkin other times of the year, but it just never seems to happen. As I was looking for some pumpkin recipes, I came across this recipe by Better Homes and Garden for pumpkin bread truffles and thought this would be a great pumpkin bread cake ball. How can you go wrong with that!

    Pumpkin Bread Cake Balls

    Pumpkin Bread Cake Balls

    The benefit of this recipe is that it makes two loaves of pumpkin bread. I used one for the truffles, which I'm calling cake balls, and I just finished the last piece of the second loaf today with my morning coffee. This is probably one of the moistest breads I have had in a long time with great pumpkin flavor. I made some minor changes to the spices, but all in all, not much needed to be changed with this recipe.

    Ingredients

    Pumpkin Bread Cake Balls Ingredients
    • Sugar
    • Canola Oil
    • Eggs
    • All Purpose Flour
    • Baking Soda
    • Salt
    • Cinnamon
    • Nutmeg
    • Canned pumpkin

    How to Make Pumpkin Bread Cake Balls

    Pumpkin Bread Cake Balls Process Collage

    First, you'll bake two loaves of the pumpkin bread. Like I mentioned before I saved one loaf of bread, and used the other loaf for the cake balls. The key to the cake balls is to make sure the pumpkin bread is cooled before you crumble it up. Once the bread has fully cooled, work it gently between your fingers until you have small pieces before adding the cream cheese frosting.

    To make the cake balls, I simply added 1 cup of cream cheese frosting to the crumbled loaf of pumpkin bread and stirred until it was fully combined. Next, I rolled the bread and frosting mixture into 24 balls. When forming the cake balls, the mixture should be moist and when you roll a ball together it should hold. If the mixture seems to dry, add another spoonful or two of frosting until it’s the right consistency. Once you add the frosting and shape the balls, keep them in the fridge for 2-3 hours before decorating. Once the balls were cooled, I dipped them into melted orange candy coating and decorated.

    After decorating the cake balls, refrigerate them to allow the coating to set. Pumpkin Bread Cake Balls are best served at room temperature. Store them in an airtight container in the refrigerator for up to two weeks.

    How to Decorate Pumpkin Bread Cake Balls

    When it comes to decorating the pumpkin bread cake balls you have a lot of creative options beyond how I chose to decorate them. You could use chocolate and enrobe the cake balls with it. If you have an air gun, you could spray the decorations on to make them look like little pumpkins. You could just cover them with candy coating and dip them in Halloween sprinkles. Take a look at Pinterest and see what kind of ideas are out there.

    Pumpkin Bread Cake Balls Completed

    Here are a few of our favorite pumpkin recipes:

    We have a few pumpkin recipes on the blog: Chocolate chip pumpkin muffins, Pumpkin Spice Pull Apart Bread, and Chocolate Pumpkin Stout Cupcakes (personally my favorite). I hope you enjoy the bread as much as we do and you'll have it all year round instead of just in October and November!

    Looking For More Recipes?

    Subscribe to my free newsletter to get new baking tips in your inbox monthly. Find me sharing new recipes and tips on Pinterest, Instagram, or Facebook.

    Pumpkin Bread Cake Balls

    Pumpkin Bread Cake Balls are bite sized cake balls made with pumpkin bread and cream cheese frosting. The perfect small dessert for your next Halloween party or fall event!
    5 from 2 votes
    Print Pin Rate
    Course: Dessert, Snack
    Cuisine: American
    Prep Time: 25 minutes minutes
    Cook Time: 1 hour hour 5 minutes minutes
    Cooling Time: 2 hours hours
    Total Time: 3 hours hours 30 minutes minutes
    Servings: 24 Servings
    Calories: 366kcal
    Author: Serena

    Ingredients

    Pumpkin Bread

    • 3 cups sugar
    • 1 cup canola oil
    • 4 eggs
    • 3 ⅓ cups all purpose flour
    • 2 teaspoons baking soda
    • 1 ½ teaspoons salt
    • 2 teaspoons ground cinnamon
    • 2 teaspoons ground nutmeg
    • ⅔ cup water
    • 1 can pumpkin (15 ounce)

    Cream Cheese Frosting

    • ½ 8-ounce package reduced-fat cream cheese, softened
    • ¼ cup butter
    • 1 teaspoon vanilla extract
    • 2 cups powdered sugar
    • 1-2 teaspoon fat free milk

    Cake Ball Coating

    • 24 ounces orange candy coating
    • 2 tablespoons chocolate candy coating
    • 2 ounces green candy coating

    Instructions

    Pumpkin Bread

    • Heat oven to 350°F.
    • Grease two 9x5x3 inch loaf pans and set aside.
    • In a large mixing bowl beat sugar and oil with an electric mixer on medium speed. Add eggs and beat well. Set aside.
    • In a second large bowl, combine flour, baking soda, salt, cinnamon, and nutmeg. Add flour mixture and water to sugar mixture. Alternating between flour and water, beating on low speed after each addition until just combined.
    • Beat in the pumpkin.
    • Spoon batter into prepared pans and bake for 60-65 minutes or until a toothpick inserted near the center comes out clean.
    • Cool in pan on wire racks for 10 minutes.
    • Remove from pans and cool completely.

    Cream Cheese Frosting

    • In a medium bowl, beat together cream cheese, butter, and vanilla with an electric mixer on medium speed until light and fluffy.
    • Gradually add powdered sugar, beating well. If needed, beat in milk until frosting reaches spreading consistency. Set aside.

    Pumpkin Cake Balls

    • Crumble one loaf of fully cooled pumpkin bread into a large bowl until you have small pieces.
    • Add the cream cheese frosting to the bowl of crumbled pumpkin bread. Stir until well combined.
    • Use a spoon to scoop out small balls of the pumpkin bread frosting mixture and roll them between your palms until rounded. Place the ball on a baking sheet covered with parchment or wax paper.
    • Keep the balls in the fridge for 2-3 hours before adding the candy coating.

    Candy Coating

    • Prepare the orange candy coating by microwaving in a medium bowl until melted. Stir every 30 seconds so it doesn’t overheat.
    • Dip a pumpkin bead cake ball into the orange candy coating. Before placing the cake ball back onto the baking sheet, let the extra candy coating drip off into the bowl. Use a fork or toothpick to dip the cake ball into the candy coating. Continue until all the cake balls are coated.
    • Melt your chocolate chips or candy coating in the microwave. You can stir the melted chocolate into whatever remains of the orange candy coating, you’ll get a deeper orange color. Add the chocolate coating to a piping bag with a small round tip. Create lines on the pumpkin cake ball by piping intersecting lines across it.
    • Melt the green candy coating in the microwave and transfer to a piping bag with a small round tip. Pipe a small dollop of green on the top center of each cake ball.
    • Refrigerate the cake balls for a short time before serving to allow the coating to set.
    • Serve the cake balls at room temperature. You can store the cake balls in an airtight container for up to two weeks.

    Notes

    Recipe Source: SerenaLissy.com
    This website provides approximate nutrition information for convenience and as a courtesy only. Nutrition data is gathered primarily from the USDA Food Composition Database via Spoonacular API, whenever available, or otherwise other online calculators. While this information can be helpful in estimating the nutritional information of a recipe, it is by no means accurate or official and is not evaluated by the Food and Drug Administration.
    All images and content are copyright protected. Do not use our images without prior permission.

    Nutrition

    Serving: 1Serving | Calories: 366kcal | Carbohydrates: 57g | Protein: 3g | Fat: 14g | Saturated Fat: 5g | Polyunsaturated Fat: 3g | Monounsaturated Fat: 6g | Trans Fat: 1g | Cholesterol: 28mg | Sodium: 265mg | Potassium: 35mg | Fiber: 1g | Sugar: 44g | Vitamin A: 51IU | Vitamin C: 1mg | Calcium: 13mg | Iron: 1mg
    Tried this Recipe? Pin it Today!Mention @SerenaLissy or tag #serenalissy!

    As an Amazon Associate and member of other affiliate programs, I earn from qualifying purchases. What that means is if you click on one of our affiliate links, they may toss a few pennies our way for a commission.

    Serena Lissy is now on Yummly

    October 23, 2015

    Have you started using Yummly yet?

    Yummly is a way to save favorite recipes to your own recipe box. It's kind of a cross between pinterest and food gawker, but better. You can search over a million recipes, save and organize them in your digital recipe box, and get recipes based on your personal taste preferences. How great is that?

    When you "yum" a recipe, it not only saves it to your personal recipe box, but notes your preferences and makes recommendations for other similar recipes.

    Come find Serena Lissy on Yummly. And be sure to "Yum" any of our recipes you see on the site.  You can find the yum button above each post.

    Yummly Label


    So go ahead! Have some fun, and yum!

    Recipe Roundup: Halloween Treats

    October 20, 2015

    15 Halloween Desserts

    Still searching for something to make or take to that upcoming halloween party? We have searched the web and found a few really creative and fun recipes. I love fun halloween treats! Doesn't matter if it's creepy, silly, or cute, I can't get enough of it. If you feel the same way, I hope you enjoy the roundup.

    The link for each recipe follows the image.

    Halloween Roundup

    Candy Corn Cake

    Candy Corn & Chocolate Chip Cookies

    Candy Toffee Bark

    Salted Caramel Apple Snickers Cake

    Chocolate Pumpkin Stout Cupcakes

    Dirt Pudding Cupcakes

    I Scream Sandwitches

    Jeweled Pumpkin Cookies

    Monster Mash Trail Mix

    Pumpkin Mousse Trifle

    Candy Corn Brownie Pies

    Halloween Surprise Sugar Cookies

    Whoopie Pies

    Candy Corn

    Poison Toffee Apples

    A Bakers Guide to Chocolate

    October 8, 2015

    Bakers Guide to Chocolate Types

    Have you ever wondered what's the difference between bittersweet chocolate and semisweet chocolate? Can I use Dutch cocoa in all my recipes calling for cocoa? Understanding the difference in chocolate and how they are used is essential to baking. In this Bakers Guide to Chocolate we will identify the characteristics of those chocolates used in baking.

    Cocoa Powder Comparison-

    Let's Start With Cocoa

    Let us start with cocoa. Cocoa is the dry chocolate powder derived from chocolate liquor. It comes in two types: natural and Dutch process. Dutch processed cocoa is processed with an alkaline. It is slightly darker, smoother, and more easily dissolved than natural cocoa. In many recipes, natural cocoa and Dutch cocoa are not interchangeable. Natural cocoa is slightly acidic and will therefore chemically react with baking soda to create carbon dioxide bubbles and some leavening power. Dutch cocoa is slightly alkaline, will not react with baking soda, and must rely on baking powder for leavening.

    Bitter Baking Chocolate

    Bitter (unsweetened) baking chocolate is made from pure chocolate liquor. By specification, it must contain 50 to 58 percent cocoa butter though with inferior products, vegetable oil may he added. Depending on the producer, milk solids, vanilla, or salt may be added. Unsweetened chocolate definitely has a bitter taste and relies on sweeteners in the recipe to make it yummy.

    Chocolate bars on a table

    Sweet Baking Chocolate

    Sweet baking chocolate, both bittersweet and semisweet chocolate have sugar added. These products must contain 35 to 50% cocoa butter but may have as little as 15% chocolate liquor. Because unsweetened chocolate has twice the chocolate liquor, we prefer to use unsweetened chocolate in most of our baking.
    Bittersweet and semisweet chocolate can be used interchangeably in recipes though there is a difference in flavor. Often, bittersweet is a more expensive chocolate and to many, a better, richer-flavored chocolate.

    Milk Chocolate

    Milk chocolate is made with ten percent chocolate liquor. It contains a minimum of twelve percent milk solids. Because it has such a low percentage of chocolate liquor, rarely is it melted and added to batter or dough.

    White Chocolate

    White chocolate contains no chocolate liquor but is made with cocoa butter. Historically, the FDA has not regulated the manufacture of white chocolate so you need to read labels carefully. If the product was made with vegetable oil instead of cocoa butter, it will not perform the same as a product with cocoa butter.

    Chocolate Bars on Table

    Chocolate Chips

    Chocolate chips are made with chocolate liquor with only minimal amounts of cocoa butter. Instead, they are made with vegetable oil and stabilizers to help them hold their shape. Without the cocoa butter, chocolate chips have a different taste and mouth feel. Chocolate chips will have a firmer set in puddings, pie fillings, and sauces than baking chocolate.

    A Bakers Guide To Chocolate

    And there you have it! The nuts and bolts of chocolate, well at least some basics. If you want to dive into more details about chocolate, take a look at our post on Everything You Need To Know About Chocolate.

    You’ve now been introduced to the different types of chocolates and their uses. Whether you are a novice or an expert baker, this guide should help you bake your way through recipes with confidence! And don’t forget to sign up for our newsletter so that we can send you new baking ideas as well as recipe updates. We want to make sure that you have all the information needed to be able to succeed in the kitchen!

    And just a fun fact for the day: Did you know that a farmer must wait four to five years for a cacao tree to produce its first beans.

    Subscribe to my free newsletter to get new baking tips in your inbox monthly. Find me sharing new recipes and tips on Pinterest, Instagram, or Facebook.

    Looking For More Recipes?

    • Chocolate Butter Cookies
    • Easy Pumpkin Chocolate Chip Muffins
    • Chocolate Guinness Cake For St. Patricks Day
    • Costa Rican Chocolate Tour: The Process, A Tour, and Cocoa

    As an Amazon Associate and member of other affiliate programs, I earn from qualifying purchases. What that means is if you click on one of our affiliate links, they may toss a few pennies our way for a commission.

    Bourbon Balls

    October 6, 2015

    No Bake Bourbon Balls

    We are just beginning #Choctoberfest, so I figured why not start with something really good. I've never been known to pass up a dessert with a bit of liquor in it. These little Bourbon Balls are just that! This is an easy recipe for a bite sized no bake dessert with just the right amount of bourbon. Bourbon balls are the perfect adult dessert for the upcoming holidays.

    Lissy Serena Bourbon Balls-

    Bourbon Balls

    Most of the time these little delights have rum in them. But there is something I love about the flavor of a really good bourbon in my desserts. I was surfing around online and saw a few recipes that all directed me to the Mast Brothers. They have a chocolate bourbon ball recipe that will knock you on your rear! Holy cow! Their main piece of advice is to test the bourbon extensively for flavor during all times of the recipe creation. Good thing the recipe was short, or we may not have made it to the end.

    After trying the recipe a few times, we made some changes to it. At the end we rolled these bourbon balls in a mixture of confectioners sugar and cocoa powder.

    History of Bourbon Balls

    Bourbon Balls, also known as Kentucky Bourbon balls, are a Kentucky confection. Bourbon Balls were created in 1938 by Ruth Hanly Booe who had left her teaching job in 1919 to start a candy business with a friend. It is said that Ruth got the idea for bourbon balls after the Kentucky Governor at the time, Ruby Laffoon, commented that there was no better taste than a bite of chocolate and a sip of bourbon. Ruth created the recipe for this no bake candy made with bourbon, pecans and chocolate. Today, Ruth’s family still runs the company, Rebecca Ruth Chocolates, and you can even order her famous bourbon balls. Over the years, people have modified and created their own versions of bourbon balls by adding different flavors to the mixture.

    Ingredients

    Bourbon Balls Ingredients
    • Vanilla Wafer Cookies
    • Pecans
    • Confectioners’ Sugar
    • Cocoa Powder
    • Maple Syrup
    • Vanilla
    • Bourbon

    When it comes to selecting bourbon for this recipe, only use really good bourbon that you love. I used Makers Mark in these. It has a great flavor that pairs well with the recipe. It's extremely strong, and there is no sense in having to tolerate bad bourbon.

    How To Make Bourbon Balls

    Bourbon Balls Process Collage

    In a food processor, mix vanilla cookies, pecans, confectioners’ sugar, and cocoa powder. Add maple syrup, vanilla paste, and bourbon to combine. Roll the mixture into small balls. If you want to be consistent with the size, you could use a cookie scoop to ensure you are getting the same size. Roll the balls in ¼ cup of confectioners’ sugar and cocoa powder to coat. Refrigerate for about an hour. Serve cool or at room temperature.

    Make Ahead Treats

    • For best flavor you could make these a few days ahead of when you are needing them. It lets the bourbon flavor settle some. You may need to roll them in powdered sugar again right before you serve.
    • For longer storage, you can freeze the bourbon balls. When you are ready to use them, let them sit overnight in the refrigerator, then at room temperature for a few hours. Then roll in powdered sugar and you are ready to serve.

    Other Bourbon Ball Flavors

    • If you are not a fan of bourbon, you can easily replace the liquor with a good quality rum, or even tequila. Even something like Baileys or Kahlua would be great.
    • I prefer my pecans toasted for a nuttier flavor. Spread the pecans on a dry skillet and cook over medium heat until slightly toasted. Stir constantly so they don't burn.
    • If you don't like pecans you could use almonds, pistachios or even walnuts.
    • You could roll the bourbon balls in the remaining vanilla wafers combined with pecans. Or even just cocoa powder.

    Next time I make these, I want to try rolling the mixture out, cutting it into squares and dipping them in tempered chocolate. Give these Bourbon Balls a try and let us know how it goes!

    Looking For More Recipes?

    Subscribe to my free newsletter to get new baking tips in your inbox monthly. Find me sharing new recipes and tips on Pinterest, Instagram, or Facebook.

    Bourbon Balls

    Bourbon Balls are a bite sized no bake chocolate treat with smooth bourbon flavor.
    5 from 13 votes
    Print Pin Rate
    Course: Dessert, Snack
    Cuisine: American
    Prep Time: 15 minutes minutes
    Cooling Time: 1 hour hour
    Total Time: 1 hour hour 15 minutes minutes
    Servings: 24 Servings
    Calories: 74kcal
    Author: Serena

    Ingredients

    • 2 cups vanilla wafer cookies
    • ½ cup pecans
    • ½ cup confectioners' sugar plus ¼ cup for rolling
    • 2 teaspoon cocoa powder plus 1 tablespoon for rolling
    • 1 ½ teaspoon maple syrup
    • ⅛ teaspoon vanilla paste
    • ¼ cup bourbon

    Instructions

    • Mix cookies, pecans, confectioners' sugar and cocoa powder in a food processor.
    • Add maple syrup, vanilla paste and bourbon to combine.
    • Roll the mixture into small balls
    • Roll the balls in ¼ cup confectioners' sugar and cocoa powder to coat.
    • Refrigerate for about an hour. Serve cool or at room temperature.

    Notes

    Recipe Source: SerenaLissy.com
    This website provides approximate nutrition information for convenience and as a courtesy only. Nutrition data is gathered primarily from the USDA Food Composition Database via Spoonacular API, whenever available, or otherwise other online calculators. While this information can be helpful in estimating the nutritional information of a recipe, it is by no means accurate or official and is not evaluated by the Food and Drug Administration.
    All images and content are copyright protected. Do not use our images without prior permission.

    Nutrition

    Serving: 1Serving | Calories: 74kcal | Carbohydrates: 10g | Protein: 1g | Fat: 3g | Saturated Fat: 1g | Polyunsaturated Fat: 1g | Monounsaturated Fat: 1g | Trans Fat: 1g | Cholesterol: 1mg | Sodium: 37mg | Potassium: 19mg | Fiber: 1g | Sugar: 6g | Vitamin A: 1IU | Vitamin C: 1mg | Calcium: 2mg | Iron: 1mg
    Tried this Recipe? Pin it Today!Mention @SerenaLissy or tag #serenalissy!

    Here are a few of our favorite Chocolate recipes:

    • Chocolate Donut Bread Pudding
    • Triple Chocolate Cheesecake
    • Chocolate Rum Banana Bread

    As an Amazon Associate and member of other affiliate programs, I earn from qualifying purchases. What that means is if you click on one of our affiliate links, they may toss a few pennies our way for a commission.

    "

    An InLinkz Link-up


    "

    Choctoberfest 2015

    October 5, 2015

    Choctoberfest-2015-1

    I am beyond excited today, because it is October 5.... and that means it is the first day of #Choctoberfest! 😀

    #Choctoberfest is a virtual event put together by The PinterTest Kitchen. Bloggers from around the world will be posting their favorite chocolate recipes, and you'll get a chance to win some awesome prizes. What's not to love?

    Here's what this event is all about!

    #Choctoberfest would not be possible without our sponsors, starting with our 2015 Gold Sponsor, Imperial Sugar. Imperial Sugar has been a trusted name in family kitchens since 1843. Their sugar products and sweeteners are made from non-GMO cane sugar and ensure consistently delicious results. We'll be using Imperial Sugar whenever we use sugar in our recipes this week, and can't wait to share the sweetness with you!

    You can find Imperial Sugar on Pinterest, Facebook, Instagram, Twitter, and more. Make sure you visit the recipes section of their website for some sweet inspiration, and you can also find coupons on their website if you want to try out Imperial Sugar yourself.

    Imperial Sugar and our other sponsors have banded together to contribute some awesome prizes for our #Choctoberfest giveaway! Entering is simple - just click below to enter the contest. Here's what you could win:

    • Granulated Sugar from Imperial Sugar
    • Chocolate Mint Essential Woman Omega Swirl and Chocolate Silk Greens from Barlean's
    • Chocolate bars (dark, milk, and white) from Lindt Chocolate
    • Hemp seed prize pack (hulled hemp seed, toasted hemp seed, hemp seed oil, and hemp protein powder) from Just Hemp Foods
    • Divine Chocolate gift set (15 flavors of chocolate bars!) from Divine Chocolate
    • Dark chocolate caramels from Tahana Confections
    • Vintage inspired gathering apron from Bless This Mess
    • Lulu's Lovepack (6 flavors of chocolate bars!) from Lulu's Chocolate
    • Pure Chocolate Lovers Supreme gift box from Pearson Farm

    We also have a nonprofit sponsor this year - Rescue Chocolate! They make vegan chocolate treats and donate 100% of their proceeds to animal shelters.

    Enter now to win the #Choctoberfest prize. Hurry, because we're picking the winner on October 12 at 8:00 AM, so if you don't sign up before then, you'll miss your chance!

    a Rafflecopter giveaway

    A huge thank you to all of the other blogs participating in #Choctoberfest 2015. Check out their blogs throughout the week for chocolate recipes you won't be able to resist:

    The PinterTest Kitchen • 2 Cookin' Mamas • A Day in the Life on the Farm • Aloha Flavor • Amy's Cooking Adventures • Angels Homestead • Balancing Motherhood • Bless this Mess • Busy-at-Home • Chocolate Slopes • Coconut & Lime • Colie's Kitchen • Cookaholic Wife • Cooking In Stilettos • Cooking With Libby • Cookistry • CopyKat Recipes • Cravings of a Lunatic • Crumbs in my Mustachio • Culinary Couture • Cupcakes Take The Cake • Deliciously Savvy • Eat It & Say Yum • Fairyburger • Famished Fish, Finicky Shark • Farm Fresh Feasts • Food Hunter's Guide to Cuisine • Full Belly Sisters • Get Off The Couch and Cook • Grumpy's Honeybunch • Hey What's for Dinner Mom? • Honey and Birch • I Can Cook That • Jane's Adventures in Dinner • Jessie Weaver • Life on Food • Life, Love, and Good Food • Majorly Delicious • Moore or Less Cooking Food Blog • Mother Would Know • Or Whatever You Do • Poet in the Pantry • Recipes Food and Cooking • Rhubarb and Honey • Sassy Southern Yankee • Savory Tart • Seduction in The Kitchen • Serena Lissy • Sumptuous Spoonfuls • Take Two Tapas • That Skinny Chick Can Bake • ThatsSoYummy • The Chonchudo Files • The Crumby Cupcake • The Dinner-Mom • The Saucy Southerner • The Spiced Life • The Spiffy Cookie • The Two Bite Club • The Weekday Gourmet • Vintage Kitty • Wendy Polisi • What A Girl Eats • WhitBit's Indian Kitchen • Wit Wisdom & Food • Zesty South Indian Kitchen

    Are you a blogger who is interested in joining us during out next community event?

    Sign up here now!

    We'll make sure you get an email about our next blogger event.

    Don't Just Make Them Hungry, Make it a "Must-Have"

    September 9, 2015

    Hamburger on plate with beer in background

    You may have heard it said before, people don't want or need your product, they want or need the BENEFIT of it. In the case of food and beverage, the "benefit" is the taste PLUS the experience.

    Hamburger on plate with beer in background

    I Gotta Have That Hamburger

    When dealing with a "sensory" product, the more your images can visually convey the "senses", the more the viewer will be able to imagine the experience and enjoyment of it. A photo of a juicy burger alone is just sustenance and might make them hungry... however, a juicy burger with a frosty mug of beer in the background sitting next to a grill or someone eating the burger while sitting outdoors with friends will transform "That burger looks good" into "I gotta have that burger!".

    Consider McDonald's. Their advertising imagery includes people enjoying their products perfectly conveying their current slogan "I'm lovin' it!". Or take a restaurant like Donovan's. Their photographs indeed show the succulent and tender filet mignon presented perfectly on the plate... AND that plate sits on a classic white table linen in their beautiful dining area with a bottle of wine and candlestick in the background.

    Companies like Kraft don't just snap a shot of their package of shredded mozzarella and describe how it melts perfectly. They SHOW someone lifting a piece of pizza with the ooey gooey yummy cheese melting off the edges with a simple headline... "No one ever drooled over the crust".

    Lady Shopping in Produce Section

    Even grocery stores like Vons understand that to attract customers, they have to show those "ingredients for life" being used in "real life" creating the experience, showing the freshness, eliciting desire for the product and the desire to purchase the product from them.

    Present The Product and Express The Experience

    From burgers, brew and corn-on-the-cob to steak, wine and crisp asparagus in a bernaise sauce, whenever there is food involved, the right imagery that presents the product AND expresses the experience will draw out increased desire. Yes, presenting the product itself is, of course, imperative and in some uses the product alone will be effective. However, for the maximum "must-have" response, illustrating the experience is essential.  

    So, take a closer look at your own images... do they show (however subtly) the "experience"? Will potential customers not only say "That burger looks good" but also "I gotta have that burger!"? If not, you may be missing the "wow" factor. If you'd like to discuss how Serena Lissy Photography can bring your food and/or beverages "to life", schedule a complimentary consultation by emailing us at info@serenalissy dot com.

    Looking For More Recipes?

    Subscribe to my free newsletter to get new baking tips in your inbox monthly. Find me sharing new recipes and tips on Pinterest, Instagram, or Facebook.

    As an Amazon Associate and member of other affiliate programs, I earn from qualifying purchases. What that means is if you click on one of our affiliate links, they may toss a few pennies our way for a commission.

    MMH Burger Challenge in Four Days

    August 27, 2015

    MMH Burger ChallengeIn August McGuire Moorman Hospitality Group, MMH, decided to have a burger challenge in Austin. I saw the social media buzzing around it and thought for a few days on whether I would participate or not; I love the MMH restaurants, but I'm not really a big hamburger fan. The dangling carrot for me was the promised $250 gift certificate to my favorite restaurant if I completed all six of the burgers in seven days. After sleeping on it, I decided to give it a go. I rounded up my trusty hamburger lover, Will, and off we went.

    Here is where the problem begins, I'm struggling with how to proceed with this post. I could tell you all the great and wonderful things about the contest, but as each day went by they got less and less. Or I can share with you all the problems that came about during the contest. (Which would make this a much juicier read.) I'm telling you, all the things that went wrong with this burger challenge are the stuff that grad students get to study and analyze for a research paper in marketing. Mark my words, some UT students will be reading case studies in five years about this fiasco.

    Before I even begin to discuss the burgers, lets talk about the rule changes that took place.  On August 14, rule change #1 came into play. No happy hour pricing on the burgers. Which is fine, but should have been a rule from the beginning. Not two weeks into the contest after the Accountants ran numbers and determined the potential cost of this contest.

    I wouldn't really call rule change #2 a rule change, but instead a twelve day early shutdown of the contest banning any new players after August 19th. With their instagram image reading, "HOLY SMOKES!! ***WE'VE HIT OUR BURGER CHALLENGE CAPACITY!***

    Imagine that! Austin is a city known for its foodies, then you throw in $250 prize, these people can eat some burgers! Oh and for what it's worth, there is also a hat included with the prize; in case that is important to anyone. Maybe rule change #3 should be, "We can't afford to produce the hats, so there won't be any". Which actually would be great because I know where my hat is going. Or maybe I should save it for that UT grad's research paper, they might get extra credit for props.

    Day 1, Burger #1: Elizabeth Street Cafe

    Now for the scoop on the hamburgers. We started at Elizabeth Street Cafe. Because this burger is "off menu", we figured it would be the hardest to obtain. We started a few weeks into the contest, and this theory was proven totally incorrect. All in all, this was a pretty good burger. It was an Asian inspired burger with griddled ham, Japanese mayo, and kimchi pickles. Now my trusty hamburger mate, Will, is someone that has a severe dislike for mayo anything. The request to have the mayo on the side was made by us, yet ignored by kitchen staff. The burger was priced at $14. I'm kind of taking the approach that $14 for a burger and nothing else on the plate, a simple request for mayo on the side should be easily done. I chalked it up to a busy night for them and left it at that.

    Day 2, Burger #1: Lamberts

    Due to some travel schedule conflicts, we needed to power through this challenge quicker than a week. So on day #2, we decided to double up and go for lunch and dinner burgers. Not sure what the heck I was thinking...but it had to be done. Lamberts was the second burger for us. They call it the "Wood Grilled Cheeseburger". Nothing fancy about this burger at all. Just a beef patty with lettuce, onion, jalapeño, bacon and cheese. Oh, don't forget the BBQ sauce spread all over it. Safe bet, good service, and the seasoned waffle fries made it a great lunch experience. $16 for this burger and fry combo.

    Day 2, Burger #2: Perla's

    I know they get really crowded and we hadn't made reservations for here. Still full from lunch, we arrived just as they opened for dinner. We quickly found a small table at the bar, and were soon joined by several other people that were all discussing the burger challenge. This was an indicator of how social this contest would become, but more on that later. The burger we received was a sizable sandwich for a double cheeseburger. (I know what you are thinking...no we didn't get to count this as two burgers) Coming from California and having eaten many In-N-Out burgers, this is the closest that I could come to describing the burger. Two thin patties, lettuce, tomato and a thousand island, mayo-ish dressing. (Ordered on the side just for Will) It was a tasty burger. In case you didn't know, Perla's has made my Best of Austin desserts list for their salted butterscotch pot de crème, how could I pass on the opportunity. Even though we were there for the burger, the dessert was the hit of the night for me.

    I officially have the meat sweats. We start to plan for the remaining three burgers based on their lunch and dinner schedules because we are now entering into the weekend restaurant scene. For those of you not familiar with Austin, for a town this size, the weekends can be chaotic at best, it's a whole other animal. Having seen so many other burger challenge participants at each restaurant we visited, we realized that reservations and solid planning would be key to completing this. So I called up Josephine house and got the last reservation available on Saturday evening. Woot! We were guaranteed a burger with the reservation. Now we just had to get through Friday at Clarks Oyster House and Jeffrey's. Should be simple, right?

    Day 3, Burger #1: Clark's Oyster Bar

    We arrived to Clark's Oyster Bar at 11am just as they opened for lunch, and within minutes the entire bar was full of people ordering hamburgers all sharing battle stories. Here is where the social aspect kicked in. We ended up chatting with other participants comparing notes on best burgers eaten, who had reservations where, what lines had they encountered, and even call back lists and processes for cancelled reservations that were in place at the restaurants. Here is where we learned that Jeffrey's was crazy. "Plan for over an hour wait at Jeffrey's outside with no guarantee for a burger!" Waiting over an hour for a hamburger is something I have never done, nor will I do again. Shoot, I have never been to Franklin's BBQ due to the long wait!

    Will and I now felt the pressure of the burger challenge. Jeffrey's was going to be the make it or break it piece in our burger quest. We will have five of the six burgers done, we can't miss the last one. While waiting for the burger to cook at Clark's we planned the strategy to get to Jeffrey's and decide we should be waiting in line by 3:30pm.

    But I'm getting ahead of myself, let me share the Clark's burger experience. Maybe I should keep it short by saying, (well actually I want to shout), BEST BURGER OF THE CHALLENGE! Angus patty, pan roasted, and butter basted made this the most flavorful, juiciest, delicious burger of the challenge, melted gruyere and a mayo based sauce added to the flavor. (You guessed it, no mayo for Will) Shoestring potatoes with fried rosemary on top. Good grief, this was my favorite burger; simple, straight forward and well executed. I wish I could of squeezed in their bread pudding for dessert, but I just couldn't do it.

    So with full bellies, back to work we went with plans to get to Jeffrey's by 3:30.

    Day 3, Burger #2: Jeffrey's

    I'll just start with it's a hot August day in Texas, y'all... Nothing like sweating profusely, standing outside for over an hour with a bunch of other hamburger crazed people. The manager was efficient with continual updates on the burger count and how many of us would be getting in. They even provided ice, water and cups for the 45 or so people in line. An hour wait, and the time had finally come. We were confirmed to get inside and get a burger. Phew...

    They only seated people in the bar area. If you have ever been in here, you know that it only holds about 35 people. Needless to say, Will and I got tablemates. People just needed to sit anywhere and get the burger ordered. It was good company and great to hear their stories as this was their last burger of the challenge.

    I was excited to try the Jeffrey's burger. At $24, one could consider it upscale. The patty was prime wagyu beef and served juicy and pink; cambozola, caramelized onions, all topped with a horseradish and caper mayo made for tasty flavors. Here is where it went wrong. Someone at the next table asked the wait staff to remove an item on the burger and the response was, "You either get a burger with nothing on it with a bun, or you get it the way we prepare it. No substitutions!" For $24 we got a suck-it-up-buttercup attitude with zero customization. Wow, makes me glad to try this place out, NOT. Also makes me probably not want to go back to Jeffrey's. I understand they are busy. But wow, to cut out all customer service and make a snarky comment like that. Ugh, that's when it was crystal clear this contest was out of control. The staff was tired, the patrons were tired. Shoot the guy at the table across from me didn't even eat the entire $24 burger. He stated, he was done and just had zero interest in the burger and was so glad this silly competition was over for him. Now I must say Will was a trooper, he sucked it up, scraped off all of his mayo and powered through it once the burger arrived.

    Day 4, Burger #1: Josephine House

    And now we are down to last but not least, Saturday night dinner at Josephine House. Our burger is guaranteed, well almost...I realize from rule changes #1, and #2, that nothing is guaranteed with this contest. The odd thing for us was that all week we had a frenetic, crazy, uncertainty laden experience, and when we got to Josephine house we were quickly seated on a cozy patio with no line, or overload of people demanding burgers in a completely relaxed atmosphere. Nice change, right? We sit down, order the burger, a couple of cocktails, and clink cheers to the finalization of my meat sweats and whining, and try to decide where we are going to get our $250 certificate for.

    The burger arrives. It's a thick patty dressed with harissa aioli and served on a homemade bun. The burger is topped with cheddar and grilled onions. Yes, you got it, we requested aioli on the side. The aioli was not served on the side, but on the burger. Finally we had enough of paying for food that wasn't prepared properly and requested the burger to have no aioli as originally ordered. The waiter quickly took the burger away, came back with a new one, and after biting into it we learned the burger was well done and not even the medium rare that we requested. After four days of the craziness and six burgers, instead of making a request to the waiter to fix the $18 burger again, we just handed him our MMH Burger Challenge card and asked him to stamp our last stamp. We were done!

    MMH Burger Challenge Card


    Here is my ranking from best to worst:

    1. Clark's Oyster House
    2. Elizabeth Street Cafe
    3. Perla's
    4. Lamberts
    5. Jeffrey's
    6. Josephine House


    The Good, The Bad and The Ugly

    August 19, 2015

    Pineapple boozy popsicle

    I have heard many times that there is no such thing as a bad cook, only bad recipes. I remember when I went off to Le Cordon Bleu. There was a lot of fear that I wasn't a good cook. How was I going to survive in that environment? Hint...I went down the pastry path.

    Boozy Blackberry Pineapple Popsicles

    Confidence Boosting

    Not that it is easier, but it worked with my math mind and need for precise and accurate measurements. But during all that time, I learned to not be afraid in the kitchen. I can whip out any mother sauce now with the best of them! It's amazing how cooking everyday boosts your confidence. Once I learned the basic techniques, then came the creativity and imagination to improvise and add onto the recipe. That's where the love comes in.

    Off to America's Test Kitchen

    After culinary school I headed to Boston to work with America's Test Kitchen. Here is where I learned the painstaking process of working with horrible recipes. But it all made sense. How do you improve on something and make it the best it can be without knowing what is wrong with other recipes out there.

    The Recipe Testing Process

    So to this day when we create recipes I still follow the America's Test Kitchen way of doing things. I start with 5-10 recipes of what I'm looking to create.

    I cook all of them, exactly as stated in the recipe, even if I know it is wrong. I round up the taste testers and we decide what is good and what is bad about the recipe. Then my goal is to take all the good things from those 5-10 recipes and create a brand new fabulous one.

    Practice Makes Progress

    After all these years I'm getting pretty good at just looking at a recipe and knowing something is going to go wrong with it. Or that it is just poorly written and the average cook won't be able to figure out what they are talking about. Or a huge pet peeve is when an ingredient is listed, but it is nowhere to be found in the directions! Ugh, yes that happens, and it happens a lot!

    This week we are in the process of testing and creating a bunch of recipes for boozy desserts. This is where we started. Following a really bad, horribly tasting recipe that is really kind of ugly for popsicles. More to come as we are headed back out to the grocery store to improve on what we have already started with.

    Looking For More Recipes?

    Subscribe to my free newsletter to get new baking tips in your inbox monthly. Find me sharing new recipes and tips on Pinterest, Instagram, or Facebook.

    As an Amazon Associate and member of other affiliate programs, I earn from qualifying purchases. What that means is if you click on one of our affiliate links, they may toss a few pennies our way for a commission.

    It Feels Good To Do Good Things

    April 29, 2015

    Cupcakes for Bake A Wish

    Today was my first cupcake donation to Bake A Wish Austin. It's a small little charity with an original mission of providing free birthday cakes to abused, neglected, or abandoned children and youth who would otherwise not receive one. Over time they have grown, and in addition they now serve birthday cakes to Austin's elderly and disabled in affordable housing communities. Since their inception in 2009, they have made over 3,500 deliveries of baked goods!

    I always hear from people, "How do you fit all that into your schedule? I can't find the time to do the volunteer work. Can't I just write a check instead?"

    I always respond with, "Of course you can. It's just a matter of setting priorities in your life. And if you still find it a challenge, write the check. It is always needed at the charities."

    For me, helping others is something I always enjoy. It doesn't matter how large or how small. And for a lady that runs through life saying...Eat Dessert First... Birthday cakes are important to me 🙂

    I look at this opportunity as a win win for both of us. I get to help others that are less fortunate than I am. I'm supporting a good cause that I believe in. And most important, I'm gaining valuable skills and experience. I always look for learning opportunities in everything I do. These cakes and cupcakes are not something I regularly do. I'm a chocolate maker, not a baker. Sure I learned how to do this in pastry school, but use it or lose it. This lets me keep using my skills that I don't normally use in my working life. And I'd like to believe that something as simple as a cupcake or a birthday cake really does make a difference in someone's life.

    And another that SUPs 21 miles to raise funds for Flatwater Foundation to fund psychological support and counseling to cancer patients and their families. Great story, awesome reasons for doing it, and it's something he loves. Pretty wonderful stuff.

    Then I sit back and think...good grief...I just made some cupcakes, look at what they are doing, as I laugh to myself wondering how do they find the time to fit that into their schedules. And again, I must say, it doesn't matter how large or how small. It doesn't matter if it's time or money. We are all in this world together, and I'd like to say that I did the best I could, and helped as many people as I could in my short time on this world. Whether it's a 21 mile SUP, or traveling the US doing random things of kindness, baking a birthday cake, or writing a check, give it a try! It feels good to do good things.

    Viva L'Italia - Hooray for Italy

    April 10, 2015

    I was invited to attend a preview of the new menu items for Schlotzsky's a few weeks back. I'm pretty selective about attending these events since I'm a pastry gal and most of these are a culinary experience. I agreed to attend this event because it has been a very long time since I have dined on a Schlotzsky's sandwich and the new menu intrigued me.

    Schlotzsky_Sandwiches

    House Made Italian Ciabatta Roll

    Growing up in the midwest, one could say bread was a daily menu item for me. I pretty much love everything about bread. I eat it, I cook it, I enjoy it, and a fresh homemade loaf is usually always part of any gift I give someone. Growing up with white Wonder brand bread, I have seen many changes in bread over the years. And I couldn't be more excited about the Schlotszky's house made Italian Ciabatta roll.

    The Sicilian, The Caprese and The Tuscan

    They serve up three sandwiches on this roll. The Sicilian, (shaved ham, provolone cheese,  pepperoni, salami, bell peppers, olives and pepperoncini). The Caprese (mozzarella cheese, tomatoes, mayo, field greens, onions, basil pesto and a balsamic glaze). And the Tuscan (hand carved roasted turkey breast, pepper jack cheese, Roma tomato, field greens, bacon, cilantro, and chipotle aioli). Once I got over the awesomeness of these sandwiches I was excited to try the pasta dishes and the pizzas.

    I must say the sandwiches are still my favorite, but with their adventurous recipes, and fresh flavor options like Tomato Basil Canestrelli, Sausage and Pepper with Goat Cheese Canestrelli, Chicken Pesto Carbonara and Bayou Chicken Canestrelli, they are pretty much serving up dishes that make me want to shout hooray for Italy!

    Looking For More Recipes?

    Subscribe to my free newsletter to get new baking tips in your inbox monthly. Find me sharing new recipes and tips on Pinterest, Instagram, or Facebook.

    As an Amazon Associate and member of other affiliate programs, I earn from qualifying purchases. What that means is if you click on one of our affiliate links, they may toss a few pennies our way for a commission.

    • « Go to Previous Page
    • Go to page 1
    • Interim pages omitted …
    • Go to page 9
    • Go to page 10
    • Go to page 11
    • Go to page 12
    • Go to page 13
    • Interim pages omitted …
    • Go to page 17
    • Go to Next Page »

    Primary Sidebar

    Hi, I'm Serena!

    Join us and you will learn all sorts of creative techniques from baking to food photography that is easy enough for a novice to recreate at home, but look and taste like they were made by a seasoned pro.

    Get Inspired, Cook Confidently, Eat Well

    More about me →

    Ice Cream Recipes

    • Scoop of chocolate mint ice cream in bowl with ice cream cone
      No Churn Chocolate Mint Ice Cream
    • Bowl of key lime pie ice cream with a spoon
      No Churn Key Lime Pie Ice Cream
    • Apple Ice Cream in a waffle cup
      Apple Ice Cream
    • Chocolate Chunk Ice Cream In A Bowl
      Chocolate Chunk Ice Cream
    • Frozen Greek Yogurt from your Instant Pot
      Instant Pot Frozen Greek Yogurt
    • Avocado Ice Cram In a serving Bowl
      Easy Avocado Ice Cream Recipe

    Popular Recipes

    • Jamaican Sweet Potato Pudding
      Jamaican Sweet Potato Pudding
    • Peanut Butter Fudge Cups
      Peanut Butter Fudge Cups
    • Samoas on a plate
      Make at Home Samoas - Homemade Samoas: Girl Scout Cookies
    • Italian Chocoalte Walnut Cake
      Italian Chocolate Walnut Cake (Torta di Noci)

    Photography Challenge

    Master The Art of Food Photography

    Footer

    ↑ back to top

    About

    • Privacy Policy

    Newsletter

    • Sign Up! for emails and updates

    Contact

    • Contact

    As an Amazon Associate, I earn from qualifying purchases.

    Copyright © 2023 Serena Lissy