• Skip to primary navigation
  • Skip to main content
  • Skip to primary sidebar
  • Home
  • Collaborate with us
  • Contact

Serena Lissy logo

  • Recipe Index
  • Privacy Policy
menu icon
go to homepage
  • Christmas
  • Recipes
  • Photography
  • About
    • Facebook
    • Instagram
    • Pinterest
  • search icon
    Homepage link
    • Christmas
    • Recipes
    • Photography
    • About
    • Facebook
    • Instagram
    • Pinterest
  • ×

    Serena Lissy » Recipes

    Blog

    Costa Rican Chocolate Tour: The Process, A Tour, and Cocoa

    March 12, 2015

    Hands Opening a Cacao Pod

    Nothing like a little trip out of the country to check out one of my favorite things. You guessed it, cocoa. We took a Costa Rican Chocolate Tour on our trip. If you have never been to a cocoa farm to see the cocoa process and you have the opportunity to go, I would highly recommend it.

    The Cocoa Process

    Costa Rican Chocolate

    Costa Rica has long been a popular tourist destination for people around the world. With its rich natural environment, friendly people and delicious cuisine, it's not hard to see why it is such a desirable vacation spot. One of Costa Rica's most popular exports is cocoa beans – and there are several reasons why so many visitors come back from their vacations with bags full of this delectable treat! In this blog post we will explore how cocoa beans are processed into chocolate, what you can expect on a chocolate tour in Costa Rica, and more.

    The Planning Process

    While planning for a Costa Rica trip, I knew that a cocoa tour was something that I had wanted to do. The challenging part was finding a farm that worked with the trip schedule. I spent 10 days in Costa Rica, but in a different city almost each day. And after a few experiences of no success with reaching the local vendors, I must say I was a bit doubtful that I would actually make it to the cocoa farm. But luck was on my side this day, as I pulled into the parking lot with minutes to spare. If you have ever been to Costa Rica, you know the roads are pretty much dirt, it's extremely windy, and roads are full of huge potholes. So something that should take 30 minutes to get to turns into a three hour experience as you celebrate each missed pot hole.

    The Cocoa Process

    You can see from the image the small flowchart of the cocoa process. On this tour, we were able to see the plants, the fermentation process, and a small bit of the drying and roasting. Then we watched them grind up the beans and made it into a delicious cocoa powder. We could then mix with hot water and got to create our own add ins for flavors.

    Cocoa Tree
    Fermentation

    The Cocoa Plants

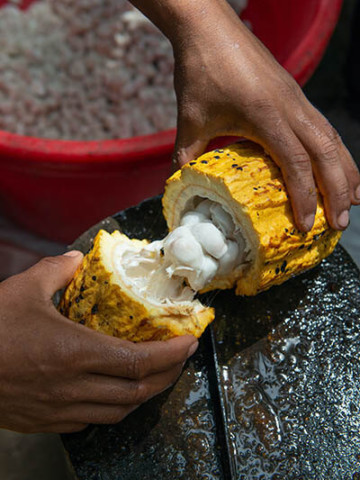
    The cocoa plants they try to keep small. The reason they do this is that it won't require ladders to pick the pods off the branches. Most of the plants we saw were around 8' tall. The pods were about the size of my hand, around 6-7". Once the pods were picked, they were broken open. You can see that each pod has about 15-20 beans. Each one of these beans are then removed and placed into the fermentation container, where they sit for seven days fermenting. Each section of the fermentation container is for a day. So you can see the process from day one through day seven.

    Drying process
    Roasting Process
    Chocolate Drink

    The Drying Process

    After they have completed the fermentation, they then go through the process of drying. This is done outside under the sunshine. Once they are dry, is when you really start to see what a cocoa bean looks and smells like. At this time, they had a small stove where they roasted some beans for the tourists to try. Once roasted they are a little softer and you can easily break them with your hand. When the roasting is completed, here is where the good stuff happens, also known as the blending of flavors once ground to create any drink you would like. I have no doubt this was everyone's favorite part. The sky was the limit and it seemed the refills would never stop. If you want to learn more about chocolate tasting we did a tasting guide to help you understand the process.

    When Was Your Last Food Tour?

    When you are in a foreign country always try to take some sort of food tour or cooking class. I do this on every trip I take and I always love it. I learn something new, I get to practice speaking the language, and I see how other cultures do things. Worth every penny.

    Looking For More Recipes?

    Subscribe to my free newsletter to get new baking tips in your inbox monthly. Find me sharing new recipes and tips on Pinterest, Instagram, or Facebook.

    As an Amazon Associate and member of other affiliate programs, I earn from qualifying purchases. What that means is if you click on one of our affiliate links, they may toss a few pennies our way for a commission.

    Austin's Best Desserts - 2015

    February 24, 2015

    Trace Chocolat Au Lait

    I don't think there are enough days in a year to enjoy all the best of desserts in this city! So I'll start with a few of my favorites and just keep adding as the year goes on. It really is a tough job, but someone does have to do it. I just hope my clothes still fit next year at this time!

    It was difficult to pick my favorites, but Austin has a little niche of awesome female pastry chefs. So I thought I would focus on restaurants that met that criteria. I met some really awesome chefs with this project. I also tried to stick with downtown, or close to downtown for this first go around since so many South by Southwest visitors use the guide. But rest assured, excellent desserts are not only downtown in this little city!

    I wish I had enough room to share every Chef's story in this post, but I cannot, so you can just check back for the updates of the conversations. I think we will go with a monthly post of Lunch With a Pastry Chef. Sticking with that theme, I am going to share my conversations that I had with Pastry Chef, Angel Begaye, from Trace.

    Angel, after being in Austin for almost a year and a half, can no longer be called a newcomer to the city. Shoot, at the rate people move here, you are practically a native after a year! Chef Angel has been working with the Starwood brand of hotels for almost 8 years now. After completing her culinary degree at Le Cordon Bleu in Arizona, she began working with the Phoenician, part of the luxury collection of Starwood hotels. Angel has a great background. She grew up in Arizona and not too far from her grandparents who lived on a Navajo reservation. As a Native American spending so much time on the reservation, she learned to appreciate the land and be extremely creative making the most with limited resources. She understands how to make due when a grocery store run isn't always available. In my mind, I have no doubt she is one of those people that can open up a refrigerator, and with only milk, eggs, maybe a vegetable, and some basic pantry items can whip up a five course dinner. Now when I open up my refrigerator and see just those ingredients, we are eating pancakes or going out for dinner.

    With those kind of skills, it's no surprise she has ended up at Trace. Trace has a dedication to socially responsible food. Their cuisine is prepared from locally sourced and sustainable ingredients. It's not uncommon to see the Trace chefs out at the downtown farmers market on Saturday mornings picking ingredients for the weeks menu planning.

    One of the items I sampled was the Johnson's Backyard Garden Beet Yogurt. This dessert is a roasted JBG red beet yogurt mousse, local honey creme, pistachio micro sponge, all topped with toasted pistachio and beet chips. It's no secret I'm not a beet eater. My first thought is ick, when someone says beets. But wow this dessert was wonderful! Earthy, smooth flavor, perfectly paired and just delicious. Not too sweet and just the right amount of beet flavor.

    The other dessert I sampled was the Chocolat au Lait. Now when the description starts with Valrhona, I'm all over it! I'm a raving fan of Valrhona, and can't get enough of it. This was a Valrhona Caramelia mousse, milk chocolate almond cake, opalys white chocolate ganache, vanilla opalys creme and raspberry gel. Even with as many components as this desert has, everyone of them was delicious.

    I don't have a favorite of these two, which is why they both made the write up. Now before we move onto some other favorites for this write up I wanted to share something that Chef Angel said during our lunch. I asked her if there was anything she wanted to make sure was mentioned in the writeup or anything about her we should know. And she thought about it for a moment and came back with such a simple but powerful statement. She said, "I believe as long as you have a fundamental appreciation of the background of food, and what you can do with it, you have endless possibilities." It's this kind of thinking that will continue to let Trace have some fabulous and creative desserts.

    Trace is located at: 200 Lavaca Street, Austin TX.

    Hours are: Breakfast M-F 6:30am - 11:00am, Sat & Sun 7:30am - 10:30am

    Lunch: M-F 11:30am - 2:30pm

    Dinner: Mon - Thurs 5:30pm - 10:00pm, Fri - Sun 5:30pm - 11:00pm

    Trace Desserts

    From Trace I jumped in the car and headed on over to Perla's. They have one of my favorite desserts that has been on the menu for a while, but I order it every single time. The Salted Butterscotch Pot de Creme with coconut lace cookies and whipped creme fraiche. Good grief that salted butterscotch flavor is soooooo delicious! Pastry Chef Natalie Gazaui is whom we have to thank for keeping this on the menu. And I hope it stays there for a really long time! Perla's has a wonderful outdoor dining area in addition to the dining room. It's one of my favorite ways to spend an hour. Sitting on that patio enjoying a cold beverage under the many shade trees eating dessert with friends. Doesn't get much better than that no matter who you are.

    Perlas is located at: 1400 South Congress Avenue, Austin, TX

    Hours are: Lunch M-F 11:30am - 3pm

    Dinner: Daily 5:30 - close

    Salted Butterscotch Pot de creme

    Next on the list is Second Bar & Kitchen. Michele Arcilla Hall is the Pastry Chef that creates these wonderful desserts. I sampled the milk chocolate hazelnut mousse, with rum roasted banana ice cream and coffee streusel. Oh that hazelnut mousse...Delish! What I love about Second Bar & Kitchen is that they have regular dessert plates and also dessert bites on the menu. So if hazelnut mousse isn't for you, maybe a sampling of dark chocolate fudge, or poppy seed snickerdoodles will be more appealing to you.

    Second Bar & Kitchen is located at: 200 North Congress Avenue, Austin TX

    Hours: Sunday - Thursday 11am - midnight, Friday & Saturday 11am - 2am

    Milk Chocolate Hazelnut Mousse

    And the last spot on the list for today is Clarks Oyster Bar. I know what you are thinking...Oyster bar...Dessert... I'm telling you, just go there! This is another spot that I couldn't commit to a favorite and actually went with two desserts. See why I'm worried already about fitting into my clothes next year?!?

    I had heard the basque cake was a must try, and my sources were correct! Cherry preserves, cream cheese ice cream and marcona almonds... YUM! But while I was there I saw the triple chocolate bread pudding. Now you are talking! Malted heath bar crunch ice cream on top of piping hot bread pudding! Oh my! If you are a bread pudding person, this is a must have.

    Clarks is located at: 1200 W 6th Street, Austin TX.

    Hours: Lunch Menu M-F 11am

    Dinner: Sunday - Wednesday until 10:30pm, Thursday - Saturday until 11:00pm

    Triple Chocolate Bread Pudding

    Basque Cake

    So there you have it! My favorite desserts for 2015...So far! And as always if you have something we must try, leave a comment and we will be sure to get there!

    AFBA City Guide Logo

    Austin's Best Donuts 2015

    February 24, 2015

    Multiple Donuts from Austin

    I will say this was a really difficult task. I don't eat a lot of donuts, but when I find the right one I can't stop eating it! Spoiler alert...A glazed donut from St Philip is that right one! Good grief, that thing is melt in your mouth delicious! And what makes it even worse is that they are close...really, really close.

    I have a round up of five donut shops. Each one made the list for their own specific reason. Now if you are looking for a donut shop in South Austin, I'd trek on over to KC donuts. These donuts were light, fluffy, not greasy and had excellent flavor. I know that bacon maple looks really good in the image, but my favorite was a good old fashion lemon filled. I could eat that lemon curd all day long! The chocolate was next on my list of favorites. They have a cream filled, or plain. Can't go wrong with either of them. And if you are a bacon lover, well then you know what you must do!

    KC Donuts can be found at: 8106 Brodie Lane, Austin TX 78745 (512) 282.9177 Open daily 7am - 3pm.

    KC Donuts

    Next on the list is Kens Donuts. It's definitely an old school donut shop by UT's West Campus. These guys offer a great solid donut. They had several flavors of cake and yeast donuts. What's great about Ken's Donuts is that they are open 24 hours a day. And wait...it gets better...they deliver! Of course there is a minimum order for that delivery, but one never knows when a donut craving will strike!

    Kens Donuts can be found at: 2820 Guadalupe, Austin TX 78705 (512) 320.8484 Open daily 24 hours

    Kens Donuts

    Then we have Red Rabbit Coop Bakery. I had never heard of these guys until I went on the donut hunt. But what I like about this donut is the convenience factor. At the Wheatsville Coop grocery store is where you can find pretty much their entire line of donuts. They have great things like Chocolate Dipped Strawberry Glazed Donuts or Coffee Glazed Donuts.  And maybe we should spend some time talking about the Austin Cream Pie Donut. So good! And I don't say this very much on my site, but these baked goods are hand made and VEGAN!

    Red Rabbit Coop Bakery Donuts can be found at: Wheatsville, both locations, Whole Foods Gateway, Whole Foods Domain. They can also be found around town at various coffee shops.

    Red Rabbit Coop Bakery Donuts

    No donut list in Austin would be complete without a mention of Gourdoughs. Now this is a donut that requires a fork and knife. They make the list just for their creative genius. In all my days, I have never seen such creations on a donut. They have a food truck on South First, but if you are so inclined, they have a brick and mortar location, Gourdoughs Public House on South Lamar where you can get hamburgers with donuts for buns and wash it all down with a beer. It's a little much for me, but I have no doubt there are some champion eaters that come to this city and Gourdoughs is exactly what they are looking for...Big Fat Donuts!

    Gourdoughs Donuts can be found at: 1503 S 1st St, Austin TX 78704 Mon-Thur 10am to Midnight, Friday 10am - 3am, Saturday 8am - 3am, Sunday 8am - midnight.

    Gourdoughs Public House: 2700 South Lamar Blvd, Austin TX 78704,  Mon - Fri 11am - midnight, Saturday 10am - 1am, Sunday 10am - midnight.

    Gourdoughs Donuts

    And last but certainly not least. The new love in my donut world is from the newcomer, St. Philip Bakeshop. The bakeshop is new, but make no mistake, this restaurant is part of the top notch Uchi brand. And the quality and superior customer service is easily identifiable as their product. They seem to change the donut creations every few weeks. The first time I stopped in they had a chocolate covered heath bar donut, and a cassis and granola donut. Now this week they have a hazelnut donut and my all time favorite, a good old fashioned glazed donut. Gosh that thing was delish! I took a few home and even after a few hours of it sitting on the counter, it was still my favorite. I know I'm going to be sad one day if I show up and it's no longer there. But I'm sure the replacement will be spectacular and over the top creative with flavors.

    St. Phillip Bakeshop can be found at: 4715 South Lamar, Austin, TX 78745. Monday - Friday 7am - 9pm, Saturday and Sunday 8am - 9pm.

    St Philip Donuts

    So there you have it! Austin's best donuts for 2015. And as always if you know of a place that should be on the list, leave a comment and we will gladly check them out!

    AFBA City Guide Logo


    Austin's Best Chocolates 2015

    February 18, 2015

    Austin Chocolates

    This is my first year writing for the city guide and I couldn't be more excited. Not only do I get to write about my favorite things, I get to sample all of those things. And it's no secret I have a love for chocolate. These chocolate folks are relative new comers to the Austin food scene and I have chosen my three favorites. We have a bean to bar maker, a retail store, and a wholesaler that is all throughout Austin specialty shops. As you can see from the images, there are quite a variety of chocolates that are produced by these three companies.

    I'll start with Srsly Chocolate. They are a bean to bar company. But first, a little background on what bean to bar is. Bob Williamson and his wife Robin Simoneaux-Williamson spend their time roasting fermented cacao beans they receive from the Conacado Cooperative in the Dominican Republic to bring out the chocolate flavor of the beans. Once roasted, they crack the beans to remove the cacao nibs from their husks. The nibs are roughly ground, where over time, they transform into a paste, before getting scooped into a granite stone mill and refined for days. Once it is fluid enough, sugar is added, and then the chocolate is tempered and poured into the molds to make the bars you see here. And I must say I can't wait to do some experimental baking with these bars! You can bet there will be future posts about this chocolate! Currently there are two bar sizes and four varieties of Srsly Chocolates. They have an 84% dark, a 70% dark, an Oaxacan espresso, and a sea salt and almond flavor.  They can be found at: Wheatsville Co-Op, Whole Foods, Live Oak Market, and River City Market.  You can also order from their website if you don't feel like having a bunch of chocolate in your suitcase to carry home. These two take their chocolate seriously but like to have fun at the same time, which is probably one of my favorite reasons for liking them so much.

    Srsly Chocolate Information Sheet

    Next on my list is Chocolaterie Tessa. Tessa Halstead is no stranger to chocolate. She started working at the age of 14 at her father's chocolate factory where her love of chocolate began, and she has continued to hone her skills over the years. Just within the last year, Tessa has opened up a retail shop. It's a cute little shop in central Austin. Small enough to feel cozy and comfortable, yet large enough to produce large volumes of European style chocolates. Tessa offers all sorts of bonbons with custom flavors like the Italian Cherry, which is whole Amarena cherry macerated in kirsch and buttercream. The Mocha Pyramid, which is coffee ganache enrobed in dark chocolate. And one cannot leave the store without getting the salted caramels. The edible boot is a special for SXSW and makes for a great souvenir at a reasonable price of $25.00 #YUM

    The store is open M-F 10-6 and Saturdays 11-4. 7425 Burnet Road, Austin, TX 78757.

    Tessa Contact Information

    And the third chocolate maker is Steve Lawrence of The Chocolate Makers Studio. Steve was my first introduction into Austin chocolates while I was at Le Cordon Bleu. If you are familiar with culinary school, then you know that everyone must do an externship. I spent about eight weeks working with Steve before leaving for America's Test Kitchen. His flavors are creative and the blends of European chocolate that he uses make a great base for his candies. His specialty is bars of chocolates and if you are going to have just one, I'd recommend the cardamom and honey caramel with sea salt bar. Or if you are looking for something Texas themed, you must try his salted brown butter TX Pecan brittle bar. I don't even like Pecans, and I love this bar! You just can't go wrong with those ingredients. Actually I should say, that anything caramel made by Steve is worth your time. Salted caramel, rosemary caramel, etc. Good grief, it's just good stuff. Oh and don't even get me going about his peanut butter and jelly bonbon. If you haven't tried it, it's a must have! He also has drinking chocolates and chocolate sauces. My favorite is the five spice drinking chocolate. Nothing like a thick hot chocolate with just the right amount of spice. Now for the chocolate sauces, the fruit blend is always top on my list when I need something delicious. Put that on ice cream on a hot summer day...DELISH

    His chocolate products can be found all around town. Antonelli's Cheese Shop, Coterie Market, Austin Wine Merchant, Prima Dora, and Breed and Co.

    Chocolate Makers Studio Information Sheet

    And there you have it! Best of Austin chocolates for 2015. If you have any other chocolate makers that we missed, please leave a message in the comments and we will be sure to get out and taste them as soon as we can.

    AFBA City Guide Logo

    How To Taste Chocolate: Notes From The Test Kitchen

    February 6, 2015

    Lady taking bite of chocolate

    Do you ever feel like there's chocolate overload? There are so many brands, types and flavors of chocolate to choose from. Sometimes it can be hard to know where to start. In my test kitchen at my shop, we were tasting some chocolates for these brown butter pecan chocolates that I wanted to make. We had six different chocolates - all very similar in taste but each with their own subtle differences. It's always a fun day when we get to spend it tasting chocolate in the test kitchen.

    I recruited a friend to help me out. Let's face it, in reality that's always the easiest part of this task, who isn't up for chocolate tasting! I provided each of us with a tasting note card like I had used at America's Test Kitchen when we had done recipe tasting. And we had a glass of water for the palate cleansing.

    Brown Butter Texas Pecan Chocolates

    In my mind, it was a simple enough task. I had sampled chocolate so many times in my life I didn't even think that others haven't. We finished with the six samples. It was clear that three contained a better blend than the others. Once we had finished I knew the one I was going to use. But after talking with my friend, he confesses that they are so close he could not make a definite choice between the remaining three. Has that ever happened to you?

    Steps to Chocolate Tasting Like An Expert

    After this tasting it occurred to me that chocolate tasting is very similar to wine tasting. Each type of chocolate contains its own set of unique flavors. The flavors change based on regions of where the cacao bean is grown. Topography, weather, soil conditions, and post harvesting also affect the taste of the chocolate. Just like wine. With so many flavors, one can see why it's important to taste carefully so you can get the fullest flavor potentials.

    Since I was mixing pecans with the chocolate I knew that pecans flavored well with fruit, specifically fruits that are in the red category, like raspberries, cherries or strawberries. Or fruit in the tropical, yellow categories. Think pineapple, pear, apple or peach. So chocolate with those aromas were important to me because I knew they would pair well with the pecans.

    Distraction Free Zone Is Important

    When I taste chocolate I prefer to do it in an environment free of distractions. Being able to concentrate and focus is extremely important. The next important thing is to make sure your palate is clean. That means if you just ate dinner, you really need to cleanse your palate. Chocolate should not taste like a hamburger. Water, especially sparkling water, is really great for a palate cleanser.

    Lady taking bite of chocolate

    The Touch

    I like to close my eyes to concentrate and just hold a piece of chocolate in my hand. The touch of chocolate is very important. Does it feel soft or hard? Is it melting in my hand? Bend the chocolate to see the amount of pressure it takes to snap the piece. Did you hear the snap when you broke the piece of chocolate?

    You Are Tasting Not Eating a Meal

    The size of chocolate is important in tasting. Here is where we sometimes get in trouble. We have to remember we are tasting, not eating an entire bar of chocolate. You want a piece large enough to accommodate the full evolution of flavor, but not fill you up.

    The Look

    Next you want to look at the chocolate. The surface should be free of blemishes. No white marks, which are known as bloom. Does the chocolate have air bubbles, swirls or uneven surfaces? Good chocolate should be free of these defects. There should also be a nice sheen on the chocolate. A matte surface is usually an indication of poor molding. This won't affect the flavor; it just makes it look ugly.

    Smell The Chocolate

    Smell the chocolate! Inhale those fragrances! What do you smell? The aroma will vary depending on its variety. Do you smell fruits, nuts, spices, or even flowers? How intense is the smell?

    Break the piece in half. You should hear a "SNAP!"

    Taste

    Now comes the good part! Pinch your nose closed, place the piece of chocolate on your tongue and allow it to get to body temperature. Let it melt slowly. You want the cocoa butter to distribute evenly in your mouth. Release your nose and take a deep breath in focusing on the aromatic notes. As it melts, concentrate on the flavors that are building on your tongue. Notice how the flavor evolves from beginning, middle to the end. Chewing is optional, but I try not to. And if I must chew, no more than three times is the rule I like to stick with.

    Chocolate Bars

    How To Talk About Your Chocolate Taste

    Ahhhh... bite number one is done. How was it? Bitter? Smooth? Creamy? Dry? Grainy? Did any changes happen in flavor from beginning to the end? Does it linger in your mouth or quickly vanish? Use a note card and write down your thoughts. What did you like? What didn't you like? Now take a drink of that water you have, and go for sample number two.

    Pecan Brittle Bars with Dark Chocolate

    In Conclusion

    I tried six different chocolates today, and when we were tasting all of them together it was hard to know where to start. They were all so delicious but what I definitely know, is that the process of trying them was a lot like tasting wine - where each taste offers its own nuances and subtleties to be explored. So if you're looking for new ways to experience this decadent treat or an excuse to host your next party with some friends over? Consider hosting a chocolate tasting event! There is a great book called Hidden Persuaders in Cocoa and Chocolate: A Flavor Lexicon for Cocoa and Chocolate Sensory Professionals by Renata Januszewska that can provide you with so much more detail on the processes of chocolate tasting and how to describe the flavors. She worked with Barry Callebaut and together they came up with The Chocolate Sensory Wheel. If you want to know a bit more about what happens on a Cocoa Farm you can read about our Costa Rican farm tour.

    Looking For More Recipes?

    Subscribe to my free newsletter to get new baking tips in your inbox monthly. Find me sharing new recipes and tips on Pinterest, Instagram, or Facebook.

    As an Amazon Associate and member of other affiliate programs, I earn from qualifying purchases. What that means is if you click on one of our affiliate links, they may toss a few pennies our way for a commission.

    Reindeer Corn

    December 24, 2014

    Reindeer Corn

    After 12 days of holiday baking, it seems like the main food groups are candy, candy canes, candy corns and syrup. So no sense in disappointing! This candy corn recipe is nothing short of delicious and easily fits into our main food groups! Reindeer Corn or Reindeer Christmas Corn is the same thing. 

    Reindeer Corn

    "We elves try to stick to the four main food groups: candy, candy canes, candy corns and syrup." — Buddy the Elf

    What is Reindeer Corn Candy you ask? It’s the Christmas version of candy corn using the unique colors of Christmas.

    We made a modified version of Alton Brown's candy corn recipe back in October and knew that this would be perfect for a gift during the holidays. It's an easy recipe with simple pantry ingredients. The little bit of honey gives this such good flavor.

    Since these are finger foods, it was super easy to package Reindeer Candy Corn up in a little bottle that I got from the store and tie a big ribbon around for decorations. You could also fill a decorative candy dish with these and wrap with holiday plastic wrap.

    It is with this final recipe that we wrap up the 12 days of holiday baking. I hope you have enjoyed the recipes as much as we did. If you have missed any of the days I feel like I should sing, on the first day of Christmas my true love gave to me...Special K Bars. On the second day of Christmas my true love gave to me...Rocky Road Bark, and Special K Bars. Somehow this just doesn't seem to work as well as the original song. So I'll spare you, but you get the idea.

    Special K Bars

    Rocky Road Bark

    Mexican Wedding Cookies

    Peppermint Bark

    Peppermint Pattie Brownies

    Salted Dulce de Leche Cookies

    Chocolate Butter Cookies

    Kringla Cookies

    Red Velvet Cookies

    Peppermint Meringues

    Peanut Butter Truffles

    And with that said, I feel I must wish everyone a happy holiday! Thank you for sticking around all year, reading the posts, trying the recipes, commenting, tweeting, liking, following and pinning. It's the simple things like that which keeps us motivated to continue cooking.

    Merry Christmas and Happy New Year. And remember...Eat Dessert First. Pass the Reindeer Corn, please.

    Reindeer Corn on table
    Serena
    5 from 14 votes

    Reindeer Corn

    Print Recipe
    The only thing better than a bag of store-bought candy corn, is to make your own! This homemade version tastes great and is surprisingly simple to make.
    Prep Time:10 minutes mins
    Cook Time:6 minutes mins
    Total Time:16 minutes mins

    Ingredients

    Candy Corn

    • 4 ½ ounces confectioner's sugar
    • ½ ounce nonfat dry milk
    • ¼ teaspoon kosher salt
    • 3 ½ ounces granulated sugar
    • 2 ½ ounces light corn syrup
    • 1 ¼ ounces honey
    • 2 ½ tablespoons water
    • 2 tablespoons unsalted butter at room temperature
    • ½ teaspoon vanilla extract
    • 2 or 3 drops each red and green gel paste food coloring

    Instructions

    Directions

    • Combine the confectioners sugar, dry milk and salt in a food processor.
    • Pulse 4 or 5 times, until the mixture is smooth and well combined. Set aside.
    • Combine the granulated sugar, corn syrup, honey and water in a 2 quart pot. Place over medium heat, cover and cook for 4 minutes.
    • Add the butter, and bring the sugar syrup to 242°, about 2 to 4 minutes.
    • Remove from heat.
    • Add the vanilla and the dry mixture and stir continuously with a silicone spatula until well combined.
    • Pour onto a half sheet pan lined with a silicone baking mat or parchment paper.
    • Cool for 20 minutes, until the mixture is cool enough to handle.
    • Divide the dough into 3 equal pieces. Add 2 or 3 drops of red food coloring to one piece and knead until the color is worked throughout.
    • Add 2 to 3 drops of the green to the second piece and knead until the color is worked throughout.
    • Leave the third piece white.
    • Cut each color of dough into thirds.
    • Roll each piece of dough into a strand about 22 inches long. Lay the strands side by side (green, red, then white) and press them together using your fingers. Cut off the uneven ends, then using a bench scraper or ruler, press each piece into a wedge, keeping the green section wide and making the white part come to a tip.
    • Use a bench scraper, pizza cutter or knife, to cut each wedge into individual candies. Lay the candies on a piece of parchment until dry. At least 2 hours. Store in an airtight container with parchment between each layer.

    Notes

    Recipe Source: SerenaLissy.com
    This website provides approximate nutrition information for convenience and as a courtesy only. Nutrition data is gathered primarily from the USDA Food Composition Database via Spoonacular API, whenever available, or otherwise other online calculators. While this information can be helpful in estimating the nutritional information of a recipe, it is by no means accurate or official and is not evaluated by the Food and Drug Administration.
    All images and content are copyright protected. Do not use our images without prior permission.

    Nutrition

    Serving: 1Serving | Calories: 190kcal | Carbohydrates: 64g | Protein: 1g | Fat: 5g | Saturated Fat: 3g | Polyunsaturated Fat: 1g | Monounsaturated Fat: 1g | Trans Fat: 1g | Cholesterol: 13mg | Sodium: 142mg | Potassium: 57mg | Fiber: 1g | Sugar: 38g | Vitamin A: 202IU | Vitamin C: 1mg | Calcium: 40mg | Iron: 1mg
    Course: Dessert, Snack
    Cuisine: American
    Servings: 5 Servings
    Calories: 190kcal
    Author: Serena
    Reindeer Corn

    Peppermint Meringues

    December 22, 2014

    Peppermint Meringues

    Light and airy Peppermint Meringues Kisses are a simple and tasty holiday treat. Perfect for gift giving and cookie exchanges these Peppermint Meringue Cookies should top your holiday baking list.

    Peppermint Meringues are a light and airy holiday treat. Give peppermint kisses this holiday season.

    "Gifts of time and love are surely the basic ingredients of a truly merry Christmas." -Peg Bracken

    As Christmas day approaches and time is running short, the upcoming recipe is nothing but short. We are talking 10 minutes to scale it out and get it prepared before putting it in the oven. Once it's in the oven, you have almost two full hours that you can spend wrapping presents, or preparing for Christmas, or doing any other items that need to be done.

    The peppermint flavor in these meringues is delicious. Not too much and not too little. These are bite size little cookies, that make great gifts if you fill a holiday mug with them and cover with a decorative plastic wrap and tie it closed with a big holiday bow.

    Peppermint Meringues Ingredients

    Ingredients in Peppermint Meringues

    I love that these only contain 4 simple ingredients!

    • Egg whites
    • Sugar
    • Peppermint extract
    • Red gel paste food coloring

    We added some red gel paste to the batter before piping the cookies. I think it makes them look a little more festive with just the tiny bit of red running through them, but if you don't have the red gel paste, go ahead and make these without it. It does nothing for the flavor and is purely decorative. You could also go with green if you have that color instead.

    Peppermint Meringues Process Collage How to Make Meringue Cookies

    Tips For Making Meringue Cookies

    • Make sure your mixing bowl and beaters are clean and free of any greasy residue. The tiniest amount of a grease film left behind will prevent the egg whites from whipping up.
    • Use eggs at room temperature.
    • Be careful when separating the eggs. If any yolk gets into the egg whites, you'll need to start over. I recommend cracking the eggs into a small bowl then when you are confident you only have the whites, add to the mixer bowl.
    • Once the meringue is shiny and has stiff peaks, stop mixing. You don't want to over mix this.

    More Peppermint Recipes You'll Love

    • Chocolate Peppermint Meringues
    • Chocolate Peppermint Cupcakes
    • White Chocolate Peppermint Bark Cheesecake

    Looking For More Recipes?

    Subscribe to my free newsletter to get new recipes in your inbox monthly. Find me sharing new recipes and tips on Pinterest, Instagram or Facebook.

    If you have missed some of the 12 days of Christmas baking, you can find recipes one through nine here. I hope you are enjoying these meringue kisses as much as the recipients are enjoying them. We would love to hear how you do with the recipe. And most important, don't forget to save some for yourself!

    Peppermint Meringues

    Light and airy peppermint meringue cookies are perfect for holifay cookie exchanges.
    5 from 10 votes
    Print Pin Rate
    Course: Dessert
    Cuisine: American
    Prep Time: 15 minutes minutes
    Cook Time: 1 hour hour 45 minutes minutes
    Total Time: 2 hours hours
    Servings: 60 Cookies
    Calories: 11kcal
    Author: Serena

    Ingredients

    • 3 egg whites
    • ¾ cup sugar
    • ½ teaspoon peppermint extract
    • Red gel paste food coloring

    Instructions

    • Preheat oven to 175°.
    • Line two baking sheets with parchment paper.
    • Fit a pastry bag with a small open star tip.
    • In a saucepan bring 1 to 2 inches of water to a simmer.
    • Put the egg whites and sugar in a heatproof bowl and place over the simmering water. Stir gently until the sugar has dissolved.
    • Transfer ingredients to an electric mixer fitted with a whisk attachment.
    • Mix on medium high speed until stiff peaks form.
    • Mix in the peppermint extract.
    • Use a small new paintbrush, and paint a couple of stripes of the food coloring inside the pastry bag.
    • Fill the bag with the meringue.
    • Pipe shapes onto the prepared baking sheets.
    • Bake the cookies until crisp but not brown, about 1 hour and 45 minutes.
    • Transfer the baking sheet to a wire rack and let the cookies cool completely on the baking sheet.
    • Store in an airtight container.

    Notes

    Recipe Source: SerenaLissy.com
    This website provides approximate nutrition information for convenience and as a courtesy only. Nutrition data is gathered primarily from the USDA Food Composition Database via Spoonacular API, whenever available, or otherwise other online calculators. While this information can be helpful in estimating the nutritional information of a recipe, it is by no means accurate or official and is not evaluated by the Food and Drug Administration.
     
    All images and content are copyright protected. Do not use our images without prior permission.

    Nutrition

    Serving: 1Cookie | Calories: 11kcal | Carbohydrates: 3g | Protein: 1g | Fat: 1g | Sodium: 3mg | Potassium: 3mg | Sugar: 3g | Calcium: 1mg | Iron: 1mg
    Tried this Recipe? Pin it Today!Mention @SerenaLissy or tag #serenalissy!
    Peppermint Meringues

    Red Velvet Cookies

    December 21, 2014

    Red Velvet Cookies

    It's feeling like winter in Austin today, so why not go with snowflakes. We don't usually get snow here, but it's chilly and wet and about as close as we are going to get before it warms up to 70 degrees this week. For day 9 of the 12 Days of Christmas Baking, we decided to go with red velvet cookies. This is an easy recipe for Red Velvet cookies with a rich red velvet taste and a sweet powdered sugar icing.

    Red Velvet Cookies

    "Kindness is like snow, it beautifies everything it covers." -Kahlil Gibran

    Red Velvet Cookies

    I'm a big red velvet fan, just like a lot of people out there.  I saw this Red Velvet cookie recipe from Created by Diane and had to give it a try. We made a few minor adjustments to the recipe, but the inspiration came from her red velvet cutout cookies that she made for a valentines heart cookie.

    The red color of the cookie pairs perfectly with the confectioners sugar icing. The white contrast of the icing really makes these red velvet cookies stand out in a tray of cookies. You could easily frost these with royal icing and decorate several cookie cutouts for a variety. Even edible glitter would look beautiful on these cookies.

    Drop Cookies or Cut Out Cookies

    Since we are making these cookies for holiday gifts I liked the elegant look of the cut out shape. If we were to make drop cookies, they are made by simply dropping a scoop of dough onto the cookie sheet and letting it spread while cooking. The cut out cookies give us an elegant shape.

    Ingredients

    Red Velvet Cookies Ingredients
    • Butter
    • Confectioner's Sugar
    • Eggs
    • Red Velvet Emulsion
    • Vanilla Extract
    • Dutch Processed Cocoa Powder
    • Chocolate Chips
    • All Purpose Flour
    • Baking Powder
    • Dry Buttermilk
    • Salt
    • Milk
    • Light Corn Syrup

    Where to Find The Red Velvet Emulsion

    The recipe calls for a red velvet emulsion from LorAnns. Usually you can find this at baking supply stores, or if you are having no luck there, you can order directly from Amazon as well.

    How to Make Red Velvet Cookies

    Red Velvet Process Collage

    First, heat your oven to 400° F. In a stand mixer fitted with the paddle attachment, cream together butter and confectioner’s sugar. Mix in red velvet emulsion, egg, vanilla, cocoa powder and melted chocolate. Next, blend in flour, baking powder, dry buttermilk, and salt. Mix until the dough pulls away from the paddle and begins to form a ball. Roll the dough out between two sheets of parchment. Then cut out shapes with a cookie cutter. Place the cut out cookie dough onto a baking sheet lined with parchment. Bake for 9 minutes or until tops of the cookies are no longer shiny and appear smooth.

    How To Make The Icing

    In a bowl combine confectioners sugar, corn syrup, and milk. The consistency will be very thick and hard to stir. Place icing in a pastry bag and pipe the icing onto the cookies after they have cooled.

    Pro Tips For Red Velvet Cookies

    • Watch baking times on this recipe. The cookie is done when the tops are no longer shiny and they are smooth.
    • Roll your dough between two sheets of parchment paper. This helps to prevent things from sticking to it.
    • If you can find LorAnns red velvet emulsion, grab it. If not, you can order red velvet emulsion from Amazon too. It's so much better than having to dye your dough with food coloring.
    • Chill the dough before removing the cut-out cookies from the bottom layer of parchment paper. This keeps the shapes in tact while they are moved to the cookie sheet.

    FAQ

    Do I need to decorate these Red Velvet Cookies with the icing?

    No, not at all. These cookies are quite delicious all on their own.

    Do I need to refrigerate the cookies?

    No, you can leave these in an airtight container on the counter for up to a week.

    Do I have to line the baking pan?

    Yes, either use a silpat or parchment paper.

    If you have missed days 1 - 8 of the 12 days of baking, you can find all the recipes here. I'm still declaring the peppermint bark as my favorite, but we still have three more days, and more yummy recipes to come.

    Give these Red Velvet Cookies a try. We would love to hear how you do with it. And don't forget to save some for yourself!

    Red Velvet Cookies

    Looking For More Recipes?

    Subscribe to my free newsletter to get new baking tips in your inbox monthly. Find me sharing new recipes and tips on Pinterest, Instagram, or Facebook.

    Red Velvet Cookies

    An easy recipe for Red Velvet cookies with a rich red velvet taste and a sweet powdered sugar icing.
    5 from 11 votes
    Print Pin Rate
    Course: Dessert, Snack
    Cuisine: American
    Prep Time: 15 minutes minutes
    Cook Time: 10 minutes minutes
    Total Time: 25 minutes minutes
    Servings: 12 Cookies
    Calories: 155kcal
    Author: Serena

    Ingredients

    Red Velvet Cookies

    • 1 cup butter
    • 1 ½ cups confectioner's sugar
    • 1 egg
    • 1 tablespoon red velvet emulsion
    • 1 teaspoon vanilla extract
    • 1 tablespoon Dutch processed cocoa powder
    • ¼ cup chocolate chips melted
    • 3 cups all purpose flour
    • 2 teaspoons baking powder
    • 2 teaspoons dry buttermilk
    • 1 teaspoon salt

    Confectioner's Sugar Icing

    • 1 cup confectioner's sugar
    • 1 tablespoon milk
    • 1 tablespoon light corn syrup

    Instructions

    Red Velvet Cookies

    • Heat oven to 400°F.
    • Cream butter and confectioner's sugar in a stand up mixer with paddle attachment.
    • Add egg, mix in red velvet emulsion, vanilla, cocoa powder and melted chocolate.
    • Blend in flour, baking powder, dry buttermilk, and salt.
    • Mix until dough pulls away from paddle and begins to form ball.
    • Roll out the dough between two sheets of parchment paper. Then cut dough with cookie cutter.
    • Bake on parchment lined baking sheet for 9 minutes.

    Confectioner's Sugar Icing

    • Combine confectioners sugar, corn syrup and milk in a bowl. The consistency will be very thick and hard to stir. Place in a pastry bag and pipe the icing onto the cookies.

    Notes

    Recipe Source: SerenaLissy.com
    This website provides approximate nutrition information for convenience and as a courtesy only. Nutrition data is gathered primarily from the USDA Food Composition Database via Spoonacular API, whenever available, or otherwise other online calculators. While this information can be helpful in estimating the nutritional information of a recipe, it is by no means accurate or official and is not evaluated by the Food and Drug Administration.
    All images and content are copyright protected. Do not use our images without prior permission.

    Nutrition

    Serving: 1Cookie | Calories: 155kcal | Carbohydrates: 55g | Protein: 5g | Fat: 2g | Saturated Fat: 1g | Polyunsaturated Fat: 1g | Monounsaturated Fat: 1g | Trans Fat: 1g | Cholesterol: 17mg | Sodium: 298mg | Potassium: 87mg | Fiber: 1g | Sugar: 4g | Vitamin A: 56IU | Vitamin C: 1mg | Calcium: 81mg | Iron: 2mg
    Tried this Recipe? Pin it Today!Mention @SerenaLissy or tag #serenalissy!

    Here are a few of our favorite Christmas cookie recipes:

    • Chocolate Butter Cookies
    • Kringla Cookies
    • Holiday Sugar Cookies

    As an Amazon Associate and member of other affiliate programs, I earn from qualifying purchases. What that means is if you click on one of our affiliate links, they may toss a few pennies our way for a commission.

    Kringla Cookies

    December 20, 2014

    Kringla Cookies on a bowl with a stuffed snowman behind it

    We're on day 8 of our 12 days of holiday baking. Christmas day is just around the corner. Today's cookie reminds me of childhood. I remember eating Kringla Cookies at a neighbor's house when I was growing up. It was a special treat for me, since my mother didn't make this cookie. Kringla cookies are a light, fluffy and just slightly sweet Norwegian cookie.

    Kringla Cookie

    "Happy, happy Christmas, that can win us back to the delusions of our childhood days, recall to the old man the pleasures of his youth, and transport the traveler back to his own fireside and quiet home!" -Charles Dickens

    Kringla Cookies

    Kringla cookies are soft, fluffy and remind you of your favorite sweet bread. They are buttery with a slightly sweet flavor. I only seem to make Kringla cookies during the holidays. There aren't many cookies that make me smile and recall the pleasures of youth as much as this one does. Is there a cookie that makes you nostalgic for something in your childhood? I'd love to know.

    History of the Kringla Cookie

    Kringla Cookies are a traditional Norwegian cookie that is commonly baked during Christmas time. Though the spelling is close, it is different than the Danish pastry, Kringle, so don’t get these two confused. Kringla is a soft cookie that is intended to be very plain. You’ll typically see Kringlas shaped into a figure eight or a pretzel shape. You have to remember that in an older time anything with a little bit of sugar was a treat. I think you’ll appreciate the simplicity and faintly sweet taste of this Norwegian Kringla cookie.

    Ingredients

    Kringla Cookies Ingredients
    • Sour Cream
    • Baking Soda
    • Eggs
    • Sugar
    • Vanilla
    • Flour
    • Baking Powder
    • Salt

    How To Make Kringla Cookies

    Kringla Cookie Process Collage

    First, mix sour cream and baking soda in a small bowl. Let it sit for a few minutes. In a medium sized bowl, beat eggs with a fork. Then add sugar and vanilla. In a third bowl mix flour, baking powder and salt. Add the sour cream mixture to the egg mixture and stir. Then add flour mixture and stir. 

    Let the dough sit overnight in the refrigerator in a plastic covered bowl. The next day heat your oven to 350°F. Roll the cookie dough into a log and cut into equal strips. On a floured work space, roll strips to about 8" long and half an inch in diameter. Shape the strips of dough into figure eights. Place dough onto an ungreased cookie sheet and bake for 10 minutes. Do not brown these. Let the cookies cool on a pan for 5 minutes then remove. Place cookies on a wire rack to cool completely.

    This cookie is very simple to make. Kringla cookies pack up nicely in a cookie tin, or you could put them on a plate with other Christmas cookies from days one through seven. 

    Expert Tips

    • Don't have time to let this dough chill overnight? I'd recommend letting it chill in the refrigerator for at least one to two hours.
    • The dough can be sticky and a little bit difficult to work with. Refrigerating overnight helps with this. You can also add a tiny bit of flour when rolling the dough out. You don't want to add too much flour, so only add a little at a time.
    • Dough still too sticky? Put it into a bag and pipe it out into the figure eight shapes.
    • Before baking, but after the cookie shapes are formed, you can brush the dough with melted butter and a sprinkle of sugar. This will add a bit of texture and shine to the cookies.

    Can I Freeze Kringla Cookies?

    Yes you can. They freeze really well. Put your baked cookies in an airtight container and place in the freezer. When you are ready to eat one, pop a frozen one into the microwave for a few seconds and it will be soft enough to enjoy.

    I hope you enjoy this Kringla cookie as much as I do. I highly recommend dipping one of these cookies into your morning coffee, so don't forget to save some for yourself!

    Kringla Cookies

    Looking For More Recipes?

    Subscribe to my free newsletter to get new baking tips in your inbox monthly. Find me sharing new recipes and tips on Pinterest, Instagram, or Facebook.

    Kringla Cookies

    Kringla cookies are a light, fluffy and just slightly sweet Norwegian cookie.
    5 from 16 votes
    Print Pin Rate
    Course: Breakfast, Dessert
    Cuisine: American
    Prep Time: 15 minutes minutes
    Cook Time: 10 minutes minutes
    Resting Time: 1 day day
    Total Time: 1 day day 25 minutes minutes
    Servings: 24 Cookies
    Calories: 94kcal
    Author: Serena

    Ingredients

    • 1 cup sour cream
    • 1 teaspoon baking soda
    • 2 eggs
    • 1 cup sugar
    • 1 teaspoon vanilla
    • 2 cups flour
    • ½ teaspoon baking powder
    • pinch of salt

    Instructions

    • In a small bowl mix sour cream and baking soda. Let sit for a few minutes.
    • In a medium sized bowl beat eggs with a fork and add sugar and vanilla.
    • In a third bowl mix flour, baking powder and salt.
    • Add sour cream mixture to the egg mixture and stir. Then add flour mixture and stir.
    • Let dough sit overnight in refrigerator in a plastic covered bowl.
    • Heat oven to 350°F.
    • Roll dough into log and cut it into equal strips. On floured work space, roll strips to about 8" long, ½ inch in diameter, and shape into figure eights.
    • Place onto an ungreased cookie sheet and bake for 10 minutes. Do not brown.
    • Let cool on pan for 5 minutes then remove and place on wire rack to cool completely.

    Notes

    Recipe Source: SerenaLissy.com
    This website provides approximate nutrition information for convenience and as a courtesy only. Nutrition data is gathered primarily from the USDA Food Composition Database via Spoonacular API, whenever available, or otherwise other online calculators. While this information can be helpful in estimating the nutritional information of a recipe, it is by no means accurate or official and is not evaluated by the Food and Drug Administration.
    All images and content are copyright protected. Do not use our images without prior permission.

    Nutrition

    Serving: 1Cookie | Calories: 94kcal | Carbohydrates: 17g | Protein: 2g | Fat: 2g | Saturated Fat: 1g | Polyunsaturated Fat: 1g | Monounsaturated Fat: 1g | Trans Fat: 1g | Cholesterol: 19mg | Sodium: 68mg | Potassium: 30mg | Fiber: 1g | Sugar: 9g | Vitamin A: 80IU | Vitamin C: 1mg | Calcium: 19mg | Iron: 1mg
    Tried this Recipe? Pin it Today!Mention @SerenaLissy or tag #serenalissy!

    Here are a few of our favorite Christmas cookie recipes:

    • Chocolate Butter Cookies
    • Red Velvet Cookies
    • Mexican Wedding Cookies

    As an Amazon Associate and member of other affiliate programs, I earn from qualifying purchases. What that means is if you click on one of our affiliate links, they may toss a few pennies our way for a commission.

    Chocolate Butter Cookies

    December 19, 2014

    Chocolate Butter Cookies

    Day 7. Wow, the 12 days of Christmas baking are really zooming by. This recipe is all about chocolate, which is a sure hit this time of year. These little Chocolate Butter Cookies are delicious plain or topped with a chocolate glaze. They have both great flavor and great texture that will melt in your mouth.

    Chocolate Butter Cookies

    "Remember, if Christmas isn't found in your heart, you won't find it under a tree." -Charlotte Carpenter

    Chocolate Butter Cookies

    This is a recipe from Cooks Illustrated Chocolate Cookies. I love using their simple cookie recipes during the holiday gift giving. Their recipes have been tested hundreds of times and they are always a safe bet. I don't ever worry about a poorly written recipe when using their recipes. This chocolate cookie is slightly crisp, yet tender, and packs a big chocolate flavor thanks to the cocoa powder.

    These can easily be packaged on a cookie plate. If you are really creative, you could stack them and package them in a decorative plastic with a big bow to give as a gift.

    Ingredients

    Chocolate Butter Cookies Ingredients
    • Unsalted Butter
    • Dutch Processed Cocoa Powder
    • Espresso Powder
    • Sugar
    • Salt
    • Eggs
    • Vanilla Extract
    • All Purpose Flour
    • Bittersweet Chocolate
    • Corn Syrup

    How To Make Chocolate Butter Cookies

    Chocolate Butter Cookies Process Collage

    First, in a medium saucepan melt 4 tablespoons of butter over medium heat. Add in cocoa powder and espresso powder. Stir until the mixture forms a smooth paste. Set aside to cool for 15-20 minutes.

    In a bowl use the stand mixer with the paddle attachment, mix the remaining 16 tablespoons of butter, sugar, salt, and cooled cocoa mixture on high speed for about one minute until well combined and fluffy. At medium speed mix in the egg yolks and vanilla. With the mixer running on low, add flour in 3 additions. Wait until each addition of flour is well incorporated before adding the next. Keep mixing until dough forms into a cohesive ball. 

    Place the dough onto a flat work surface and dive into three 4-inch disks. Wrap each disk in plastic wrap and refrigerate for about 60 minutes until the dough is firm, yet malleable. 

    Line a large baking sheet with parchment paper. Move the oven rack to middle position and heat the oven to 375°F. Roll out one dough disk between two large sheets of parchment paper until it is of even thickness, 3/16 inch. Peel parchment off one side of the dough and cut into desired shapes with a cookie cutter. 

    Place on a baking sheet about one inch apart. Bake for 10-12 minutes or until cookies offer slight resistance to touch. Cool for 5 minutes and then use a spatula to transfer to a wire rack to cool completely.

    How to Make Bittersweet Chocolate Glaze

    Melt 4 ounces of bittersweet chocolate with 4 tablespoons of unsalted butter and whisk until smooth. Add 2 tablespoons of syrup and 1 teaspoon of vanilla extract and mix until smooth and shiny. Use the back of a spoon to spread a scant teaspoon of glaze up to the edge of the cookies. Allow the freshly glazed cookies to dry for at least 20 minutes. Now they're ready to eat and enjoy!

    Special Equipment to Make The Cookies

    You want your dough to be of even thickness when rolling out. I like to use a rolling pin with thickness guides to ensure I roll the dough out evenly. I used a simple Christmas Tree cutter for my cookies, but use any cookie cutter you have.

    Cookie Tips

    • Butter should be soft enough that your finger will leave an indent if pressed into the butter, but not soft enough that your finger can press all the way through.
    • Be sure to measure your ingredients properly. Too much flour is a key factor in dry cookies.
    • Line your baking pan with parchment paper, or a Silpat.
    • This cookie dough freezes well. Wrap your 4" disk well or place in an airtight container and place in the freezer. When ready to use, thaw in the refrigerator.
    • These cookies will keep for about a week in an airtight container for about a week.

    If you are catching up on days one through six, here is where you can find all the other holiday recipes. I hope you enjoy this recipe for chocolate butter cookies as much as I do and don't forget to save some for yourself!

    Chocolate Butter Cookies

    Looking For More Recipes?

    Subscribe to my free newsletter to get new baking tips in your inbox monthly. Find me sharing new recipes and tips on Pinterest, Instagram, or Facebook.

    Chocolate Butter Cookies

    Chocolate Butter Cookies

    An easy chocolate butter cookies recipe with a bittersweet chocolate glaze. These cookies are slightly crisp, yet tender, with big chocolate flavor. These are delicious plain or topped with the chocolate glaze.
    5 from 11 votes
    Print Pin Rate
    Course: Dessert, Snack
    Cuisine: American
    Prep Time: 30 minutes minutes
    Cook Time: 12 minutes minutes
    Resting Time: 1 hour hour
    Total Time: 1 hour hour 42 minutes minutes
    Servings: 12 Cookies
    Calories: 438kcal
    Author: Serena

    Ingredients

    Cooks Illustrated - Chocolate Butter Cookies

    • 20 tablespoons unsalted butter softened to cool room temperature
    • ½ cup Dutch processed cocoa powder
    • 1 teaspoon espresso powder
    • 1 cup sugar
    • ¼ teaspoon salt
    • 2 large egg yolks
    • 1 tablespoon vanilla extract
    • 2 ¼ cups all purpose flour

    Chocolate Glaze

    • 4 ounces bittersweet chocolate
    • 4 tablespoons unsalted butter
    • 2 tablespoons corn syrup
    • 1 teaspoon vanilla extract

    Instructions

    • Melt 4 tablespoons of butter in medium saucepan over medium heat.
    • Add cocoa powder and espresso powder; stir until mixture forms smooth paste. Set aside to cool 15 - 20 minutes.
    • In bowl of stand mixer fitted with paddle attachment, mix remaining 16 tablespoons butter, sugar, salt and cooled cocoa mixture on high speed until well combined and fluffy, about 1 minute.
    • Add yolks and vanilla and mix on medium speed until combined.
    • With mixer running on low, add flour in 3 additions, waiting until each addition is incorporated before adding next. Continue to mix until dough forms cohesive ball.
    • Turn dough onto work surface; divide into three 4-inch disks.
    • Wrap each disk in plastic wrap and refrigerate until dough is firm, yet malleable, 60 minutes.
    • Line large baking sheet with parchment paper.
    • Adjust oven rack to middle position and heat oven to 375°F.
    • Roll out 1 dough disk between 2 large sheets of parchment paper to even thickness of 3/16 inch. Peel parchment from one side of dough and cut into desired shapes using cookie cutters.
    • Place on prepared baking sheet, spacing them about 1 inch apart.
    • Bake until cookies offer slight resistance to touch, 10 - 12 minutes.
    • Cool for 5 minutes, then using spatula, transfer cookies to wire rack and cool completely.

    Bittersweet Chocolate Glaze

    • Melt 4 ounces bittersweet chocolate with 4 tablespoons unsalted butter and whisk until smooth.
    • Add 2 tablespoons corn syrup and 1 teaspoon vanilla extract and mix until smooth and shiny.
    • Use back of spoon to spread scant teaspoon glaze to edge of cookie.
    • Allow glazed cookies to dry at least 20 minutes.

    Notes

    Recipe Source: SerenaLissy.com
    This website provides approximate nutrition information for convenience and as a courtesy only. Nutrition data is gathered primarily from the USDA Food Composition Database via Spoonacular API, whenever available, or otherwise other online calculators. While this information can be helpful in estimating the nutritional information of a recipe, it is by no means accurate or official and is not evaluated by the Food and Drug Administration.
    All images and content are copyright protected. Do not use our images without prior permission.

    Nutrition

    Serving: 1Cookie | Calories: 438kcal | Carbohydrates: 45g | Protein: 4g | Fat: 28g | Saturated Fat: 17g | Polyunsaturated Fat: 1g | Monounsaturated Fat: 8g | Trans Fat: 1g | Cholesterol: 93mg | Sodium: 58mg | Potassium: 149mg | Fiber: 3g | Sugar: 23g | Vitamin A: 748IU | Calcium: 25mg | Iron: 2mg
    Tried this Recipe? Pin it Today!Mention @SerenaLissy or tag #serenalissy!

    Here are a few of our favorite holiday cookie recipes:

    • Kringla Cookies
    • Red Velvet Cookies
    • Holiday Sugar Cookies

    As an Amazon Associate and member of other affiliate programs, I earn from qualifying purchases. What that means is if you click on one of our affiliate links, they may toss a few pennies our way for a commission.

    Easy Rocky Road Chocolate Bark

    December 12, 2014

    America's Test Kitchen Rocky Road Chocolate Bark

    We have made it to day two in the 12 days of holiday baking and are going with an Easy Rocky Road Chocolate Bark. This is an easy recipe for a Rocky Road flavored chocolate bark made with rich chocolate and filled with marshmallows, graham crackers, and almonds. It’s just like Rocky Road ice cream only in bark form. If you missed yesterday’s recipe, it was an old classic called Special K Bars. These go great with your coffee in the morning. It’s almost like a bowl of cereal, covered with chocolate. Ok…maybe not… Just accept that it’s a piece of candy with your coffee and enjoy it guilt free.

    America's Test Kitchen Rocky Road Bark

    "As we give presents at Christmas, we need to recognize that sharing our time and ourselves is such an important part of giving" - Gordon B Hinckley

    Some Time At America's Test Kitchen

    Last year at this time, I was in Boston freezing off my you know what, working at America’s Test Kitchen. It was not a permanent position with them, so I decided to rent a furnished studio basement apartment and keep all my belongings at home. My kitchen was almost nonexistent. I had a hot plate, microwave, bed, chair, and T.V. I didn't even have a car. It was definitely quite different than the lifestyle I had come from.

    It was that experience that reminded me how wonderful it could be to share our time and ourselves. I didn’t have anything else to give. I also wasn’t used to the kitchen shutting down at 5:00pm. It had been 20 years since I was done working at 5:00pm on a daily basis. Wow, did I ever have time! I made some of the best friends there. It’s amazing what happens when we have time and share it with others. It seems in today’s world of electronics, we pretty much don’t need anyone, and there is almost no need to ever actually speak to someone. I can now just text them, email them, or Skype them. Wow how times have changed and it’s so easy to forget to share our time and ourselves.

    It felt right to whip up a recipe from America’s Test Kitchen this year to share with others. So I pulled out a special interest publication from them on holiday baking. I’m a big fan of holiday barks. They had a nice rocky road bark. So I figured why not. Looks good and who doesn’t love chocolate, graham crackers and marshmallows? This Rocky Road Chocolate Bark was so simple and is easy to give for holiday presents.

    Ingredients

    Rocky Road Bark Ingredients
    • Graham Crackers
    • Unsalted Butter
    • Brown sugar
    • Salt
    • Milk Chocolate Chips
    • Mini Marshmallows
    • Pecans, Walnuts, or Almonds

    How to Make Rocky Road Chocolate Bark

    Rocky Road Bark Process Collage

    First, move your oven rack to the center position and preheat to 375°F. Line an 8 inch square baking pan with aluminum foil. Tuck in the foil to the corners and leave at least a one inch overhang of foil on the top of the pan. Line the bottom of the pan with graham crackers in a single layer. Break them up if needed to make them fully cover the bottom of the pan. 

    In a small saucepan on low heat combine butter, brown sugar, and salt. Stir constantly until butter is melted and sugar is dissolved. Pour the butter-sugar mixture onto the layer of graham crackers. Smooth with a small spatula to fully cover the crackers. Bake for 10-12 minutes until the caramel is bubbling. 

    Remove from the oven and sprinkle an even layer of chocolate chips. Place the pan back in the oven for 2 minutes to soften the chocolate. Remove from the oven and use a rubber spatula to smooth the chocolate into an even layer. 

    Next, sprinkle marshmallows and nuts over the chocolate. Lightly press with your fingertips to adhere the marshmallows and nuts to the chocolate. Cool on a wire rack for 30 minutes. Then freeze for about 30 minutes until the chocolate hardens. When it’s ready, grab the foil overhang and lift the bark from the pan onto a cutting board. Use a knife to cut the bark into 2 inch squares. Layer pieces between sheets of waxed paper and store in an airtight container. You can refrigerate this bark for up to one week.

    Add Ins

    Next time I try this, I’ll fancy it up a bit. We made graham crackers a while back for a cheesecake. Those would be great for this bark. And we made a homemade marshmallow during Valentines and that would be great instead of the mass produced mini marshmallows that come in a bag. You could replace the freeze dried strawberries in that recipe with ground up peppermint candy for this recipe. If you don’t have almonds you can replace with pecans, walnuts, or even peanuts.

    Rocky Road Chocolate Bark Tips

    • Keep this Rocky Road Chocolate Bark stored in the refrigerator.
    • Traditional rocky road used almonds. This is what I prefer but you could use any other kind of nut that you like. Walnuts, peanuts, or pistachios would all be nice.
    • Ghirardelli or Guittard make a nice chocolate chip for this recipe. If you have nicer chocolate bars at home, you could also use those and just cut them up.

    I hope you enjoy the bark, and don't forget to save some for yourself.

    Rocky Road Bark

    Looking For More Recipes?

    Subscribe to my free newsletter to get new baking tips in your inbox monthly. Find me sharing new recipes and tips on Pinterest, Instagram, or Facebook.

    America's Test Kitchen - Rocky Road Chocolate Bark

    A recipe for Easy Rocky Road Chocolate Bark made with rich chocolate and layered with marshmallows, graham crackers, and almonds.
    No ratings yet
    Print Pin Rate
    Course: Dessert, Snack
    Cuisine: American
    Prep Time: 15 minutes minutes
    Cook Time: 14 minutes minutes
    Total Time: 29 minutes minutes
    Servings: 16 Servings
    Calories: 138kcal
    Author: Serena

    Ingredients

    America's Test Kitchen - Rocky Road Bark

    • 6 whole graham crackers
    • 6 tablespoons unsalted butter
    • ¼ cup packed light brown sugar
    • ½ teaspoon table salt
    • 1 cup milk chocolate chips
    • ¾ cup mini marshmallows
    • ½ cup chopped pecans, walnuts, or almonds

    Instructions

    • Adjust oven rack to center position and heat oven to 375°F.
    • Line 8-inch square baking pan with aluminum foil, making sure the foil is tucked into all corners and that at least 1 inch of foil overhangs top of pans on all sides.
    • Line bottom of pan with graham crackers in a single layer, breaking them if necessary to fit tightly.
    • Combine butter, brown sugar, and salt in small saucepan and cook over low heat, stirring constantly, until butter is melted and sugar has dissolved.
    • Scrape butter-sugar mixture onto graham crackers and smooth with small rubber spatula to cover crackers. Bake until caramel is bubbling. 10-12 minutes.
    • Remove pan from oven, sprinkle evenly with chocolate chips, and return to oven to soften chocolate, 2 minutes. Remove pan from oven and, using rubber spatula, smooth chocolate into even layer.
    • Sprinkle marshmallows and then nuts over chocolate. Press lightly with fingertips to adhere marshmallows and nuts to chocolate.
    • Cool on wire rack 30 minutes, then freeze until chocolate hardens, about 30 minutes.
    • Grabbing foil overhang, lift from pan onto cutting board and use knife to cut bark into 2-inch squares.
    • Layer pieces between sheets of waxed paper in airtight container and refrigerate for up to 1 week.

    Notes

    Recipe Source: SerenaLissy.com
    This website provides approximate nutrition information for convenience and as a courtesy only. Nutrition data is gathered primarily from the USDA Food Composition Database via Spoonacular API, whenever available, or otherwise other online calculators. While this information can be helpful in estimating the nutritional information of a recipe, it is by no means accurate or official and is not evaluated by the Food and Drug Administration.
    All images and content are copyright protected. Do not use our images without prior permission.

    Nutrition

    Serving: 1Serving | Calories: 138kcal | Carbohydrates: 14g | Protein: 1g | Fat: 9g | Saturated Fat: 4g | Polyunsaturated Fat: 1g | Monounsaturated Fat: 3g | Trans Fat: 1g | Cholesterol: 13mg | Sodium: 113mg | Potassium: 28mg | Fiber: 1g | Sugar: 10g | Vitamin A: 133IU | Vitamin C: 1mg | Calcium: 11mg | Iron: 1mg
    Tried this Recipe? Pin it Today!Mention @SerenaLissy or tag #serenalissy!

    Here are a few of our favorite chocolate recipes for the holiday season:

    • Homemade Peppermint Bark
    • Special K Bars
    • Peanut Butter Truffles

    As an Amazon Associate and member of other affiliate programs, I earn from qualifying purchases. What that means is if you click on one of our affiliate links, they may toss a few pennies our way for a commission.

    Special K Bars

    December 11, 2014

    Santa With Special K Bars

    This year I decided to whip up my 12 days of Christmas cookies and candies for the loved ones. It's a blend of old favorite recipes, and a few new ones I haven't tried before. Day one is an old favorite from my teenage years, called Special K Bars. And when I say old, I mean I found the recipe shoved in a Betty Croker cookbook on a piece of paper, typed, with what appears to be peanut butter stains on it. Not that I'm saying I'm old, but we all know the life cycle of a typewriter. Do they even exist anymore? So for clarification, I know the recipe is old, there was no mention of me being old.

    Special_K_Bars_With_Santa

    "Maybe Christmas, he thought...doesn't come from a store. Maybe Christmas, perhaps...means a little bit more."  -The Grinch

    It's that time of year for a Special K Bar recipe. December has come and it's time for all the joys of the season. I've always been the kind of person that makes bread for the neighbors, friends, and family, or a plate of cookies for them at Christmas. I've never been much of a shopper. And a shopper at holiday times when every store around is five times as crowded, there is no parking, and everyone is in a hurry and cranky?!?! No thank you!

    I'd much rather sit at home with the holiday music playing, a glass of wine in hand, looking through cookbooks, finding old favorites, and searching out new recipes to try. I then make my list of recipients and I let the baking begin. There is something so satisfying about this to me. I'm doing what I love, for the loved ones in my life. And they usually love the gift of food. It's a win/win unless the loved ones in my life are on a diet this time of year! Let's be honest...there is nothing low fat, gluten free, or reduced calories in my holiday baking.

    These Special K bars are super simple to make. And the flavor of the butterscotch chips blended with chocolate chips on top of the peanut butter and sugars are just delicious. Cut them up into one-inch squares and package them in a Christmas tin or serve them on an inexpensive holiday plate, and they make a great gift. I hope you enjoy these as much as I do, and be sure to save a few for yourself.

    Reader Favorites:
    Lemon Poppy Seed Bundt Cake
    Cranberry Pear Spice Crisp
    Chocolate Crepe

    FAQ

    What can I replace the butterscotch chips with?

    You can easily replace them with more chocolate chips. You could also go with Reeses peanut butter chips. I’d melt those individually and swirl throughout the chocolate. 

    Do I have to use only Special K or is there another cereal that works?

    You could definitely use Corn Flakes instead of Special K.

    I can’t get the peanut butter layer to be even, what can be done?

    For this I usually just go with my hands. I use a glove, and then spray a tiny amount of cooking spray on the gloves and press down. If you don’t have a glove, you could use a ziploc bag. Place your hand in one of those, spray with cooking spray and use that instead of a spatula. 

    Why is it taking so long to cool? I’m hungry now! 

    If you want to speed up the cooling process, you could put the pan in the refrigerator for a half hour, then cut the bars. 

    Is this Special K bar gluten free?

    No, but you could easily make it gluten-free by using gluten free cereal. Natures Path and Nestle have a gluten free corn flake. Kellogg’s had at one time made a gluten free Special K cereal, but I don’t see it on the shelves anymore.

    Special K Bars

    These fool-proof, no-bake special K bars are perfect for any chocolate & peanut butter lover!
    No ratings yet
    Print Pin Rate
    Course: Dessert, Snack
    Cuisine: American
    Prep Time: 10 minutes minutes
    Cook Time: 10 minutes minutes
    Total Time: 20 minutes minutes
    Servings: 24 Bars
    Calories: 199kcal
    Author: Serena

    Ingredients

    • 1 cup sugar
    • 1 cup Karo Corn Syrup
    • 1 ½ cup peanut butter
    • 2 teaspoon vanilla
    • 6 cups Special K cereal
    • 1 bag butterscotch chips
    • 1 bag chocolate chips

    Instructions

    • Butter a rectangular 13" x 9" cake pan and set aside.
    • Put the Special K cereal in a separate bowl and set aside.
    • Bring sugar and corn syrup to boil in a medium sized saucepan.
    • Once boiling, add peanut butter and vanilla and stir until melted.
    • Pour the sugar mixture over the cereal and stir to coat.
    • Pour the cereal mixture into the cake pan and spread with a spatula to cover the cake pan
    • Melt chocolate chips and butterscotch chips together in a double boiler. Once melted pour over the cereal mixture and let set until hardened.

    Notes

    Recipe Source: SerenaLissy.com
    This website provides approximate nutrition information for convenience and as a courtesy only. Nutrition data is gathered primarily from the USDA Food Composition Database via Spoonacular API, whenever available, or otherwise other online calculators. While this information can be helpful in estimating the nutritional information of a recipe, it is by no means accurate or official and is not evaluated by the Food and Drug Administration.
    All images and content are copyright protected. Do not use our images without prior permission.

    Nutrition

    Serving: 1Bar | Calories: 199kcal | Carbohydrates: 23g | Protein: 4g | Fat: 8g | Saturated Fat: 2g | Polyunsaturated Fat: 2g | Monounsaturated Fat: 4g | Cholesterol: 1mg | Sodium: 84mg | Potassium: 105mg | Fiber: 1g | Sugar: 21g | Vitamin A: 1IU | Calcium: 9mg | Iron: 1mg
    Tried this Recipe? Pin it Today!Mention @SerenaLissy or tag #serenalissy!
    Special_K_Bars_Plated

    This post contains affiliate links. Which means that Amazon may give us a few pennies if you purchase one of the items.

    • « Go to Previous Page
    • Go to page 1
    • Interim pages omitted …
    • Go to page 10
    • Go to page 11
    • Go to page 12
    • Go to page 13
    • Go to page 14
    • Interim pages omitted …
    • Go to page 17
    • Go to Next Page »

    Primary Sidebar

    Hi, I'm Serena!

    Join us and you will learn all sorts of creative techniques from baking to food photography that is easy enough for a novice to recreate at home, but look and taste like they were made by a seasoned pro.

    Get Inspired, Cook Confidently, Eat Well

    More about me →

    Ice Cream Recipes

    • Scoop of chocolate mint ice cream in bowl with ice cream cone
      No Churn Chocolate Mint Ice Cream
    • Bowl of key lime pie ice cream with a spoon
      No Churn Key Lime Pie Ice Cream
    • Apple Ice Cream in a waffle cup
      Apple Ice Cream
    • Chocolate Chunk Ice Cream In A Bowl
      Chocolate Chunk Ice Cream
    • Frozen Greek Yogurt from your Instant Pot
      Instant Pot Frozen Greek Yogurt
    • Avocado Ice Cram In a serving Bowl
      Easy Avocado Ice Cream Recipe

    Popular Recipes

    • Jamaican Sweet Potato Pudding
      Jamaican Sweet Potato Pudding
    • Peanut Butter Fudge Cups
      Peanut Butter Fudge Cups
    • Samoas on a plate
      Make at Home Samoas - Homemade Samoas: Girl Scout Cookies
    • Italian Chocoalte Walnut Cake
      Italian Chocolate Walnut Cake (Torta di Noci)

    Photography Challenge

    Master The Art of Food Photography

    Footer

    ↑ back to top

    About

    • Privacy Policy

    Newsletter

    • Sign Up! for emails and updates

    Contact

    • Contact

    As an Amazon Associate, I earn from qualifying purchases.

    Copyright © 2023 Serena Lissy